Success Return on Forms
Freeform offers a wide variety of ways to handle the success return on forms. Check out the list below to see all available options and how to use them:
- Reload form with banner
- Replace with success message
- Redirect to another URL
- Redirect to an entryNew in 5.15+
Reload form with banner
If you'd like to customize the success banner message for your form, choose one of the options below.
- Form Builder
- Template
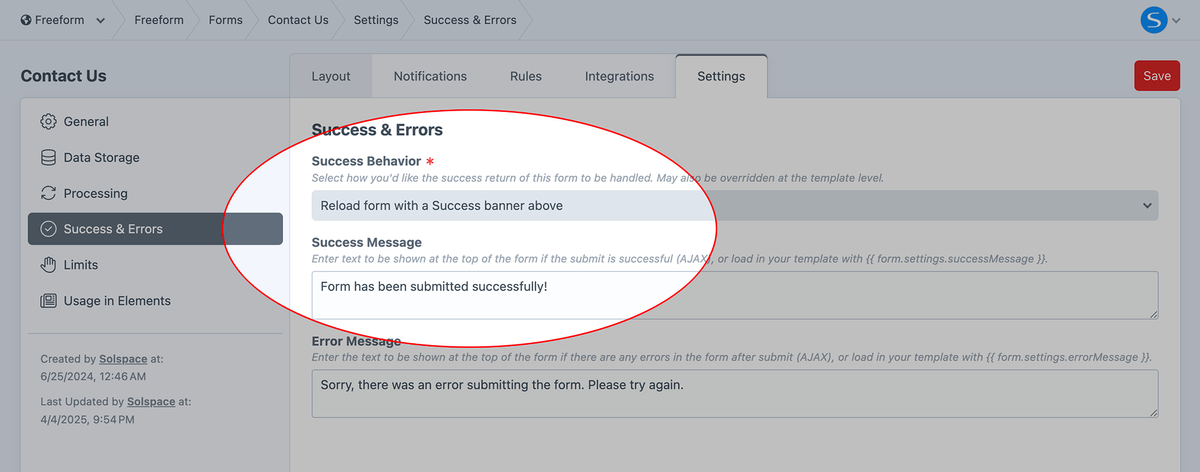
Go to the Success & Errors section under the Settings tab in the form builder.
For the Success Behavior setting, select the Reload form with banner option.
For the Success Message setting, enter the message you'd like.
It's also possible to override the success and error messages at the template level using the Freeform JS Plugin:
- Apply to ALL forms on the page
- Apply to a specific form
{{ freeform.form("myFormHandle").render() }}

<script>
  document.addEventListener('freeform-ready', function(event) {
    event.options.successBannerMessage = 'My custom success message';
    event.options.errorBannerMessage = 'My custom error message';
  });
</script>
{{ freeform.form("myFormHandle", {
  attributes: { id: 'my-form' },
}).render() }}

<script>
  const form = document.getElementById('my-form');
  form.addEventListener('freeform-ready', function (event) {
    event.options.successBannerMessage = 'My custom success message';
    event.options.errorBannerMessage = 'My custom error message';
  });
</script>
Replace with success message
If you'd like to have your entire form replaced with custom success content, choose one of the options below.
- Form Builder
- Template
Go to the Template Manager settings area and configure the Success Templates directory.
Add a new Success template. A basic one might look like this:
<div id="freeform-success">
  <h3>Thank you!</h3>
  <p>We have successfully received your submission.</p>
</div>
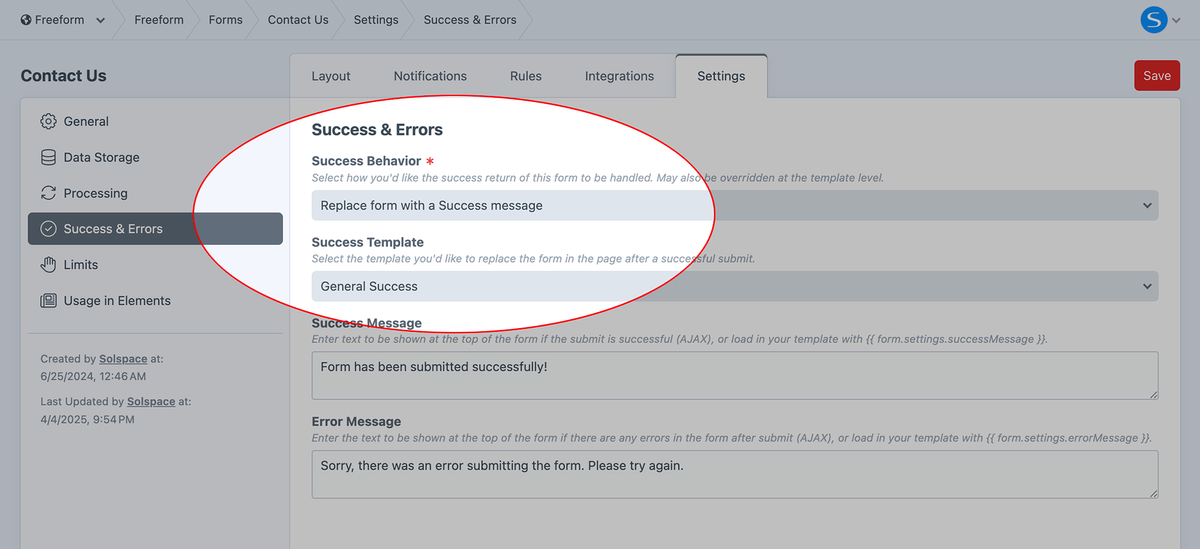
Go to the Success & Errors section under the Settings tab in the form builder.
For the Success Behavior setting, select the Replace with success message option.
For the Success Template setting, select a Success template.
It's also possible to override this at the template level using the Freeform JS Plugin, and can be done as a template or a div.
- With a Template
- With a Div
Create a new form or edit an existing one as usual. Be sure to enable AJAX for the form inside the form settings area in the form builder.
Create a new template to hold the success contents, e.g. named ajax-success.twig with content of:
<h3>Thank you!</h3>
<p>
  We have received your submission. You may now
  <a href="{{ siteUrl('path-to/file.pdf') }}">download the PDF guide</a>.
</p>
Wrap your existing form render with a div to make it easier to swap out with the success template, e.g. form-wrapper:
<div id="form-wrapper">
  {{ freeform.form('myContactForm').render }}
</div>
In the footer of the template that will contain the form, be sure to include something like this in the footer area:
<script src="https://code.jquery.com/jquery-3.5.1.js"></script>
<script type="text/javascript">
  document.addEventListener('freeform-render-success', function (event) {
    // Disable the default success rendering
    event.preventDefault();
    // We locate the 'form-wrapper' DIV element which contains our form
    // and we swap its contents (the whole form) with the HTML that we
    // fetch from the "/freeform-demo/ajax-success" template
    $('#form-wrapper').load('/freeform-demo/ajax-success');
  });
</script>
Your final template code might look something like this:
<div id="form-wrapper">
  {{ freeform.form('myContactForm').render }}
</div>

<script src="https://code.jquery.com/jquery-3.5.1.js"></script>
<script type="text/javascript">
  document.addEventListener('freeform-render-success', function (event) {
    event.preventDefault();
    $('#form-wrapper').load('/freeform-demo/ajax-success');
  });
</script>
Create a new form or edit an existing one as usual. Be sure to enable AJAX for the form inside the form settings area in the form builder.
Add a div to hold the success contents inside your existing template that contains the form, e.g. custom-content:
<div id="custom-content">
  <h3>Thank you!</h3>
  <p>
    We have received your submission. You may now
    <a href="{{ siteUrl('path-to/file.pdf') }}">download the PDF guide</a>.
  </p>
</div>
Wrap your existing form render with a div to make it easier to swap out with the custom success div, e.g. form-wrapper:
<div id="form-wrapper">
  {{ freeform.form('myContactForm').render }}
</div>
In the footer of the template that will contain the form, be sure to include something like this in the footer area:
<script src="https://code.jquery.com/jquery-3.5.1.js"></script>
<script type="text/javascript">
  document.addEventListener('freeform-render-success', function (event) {
    // Disable the default success rendering
    event.preventDefault();
    // We locate the 'form-wrapper' DIV element which contains our form
    // and we swap its contents (the whole form) with the HTML that we
    // fetch from any other element already present on the page
    $('#form-wrapper').html($('#custom-content').html());
  });
</script>
Your final template code might look something like this:
<div id="form-wrapper">
  {{ freeform.form('myContactForm').render }}
</div>

<div id="custom-content">
  <h3>Thank you!</h3>
  <p>
    We have received your submission. You may now
    <a href="{{ siteUrl('path-to/file.pdf') }}">download the PDF guide</a>.
  </p>
</div>

<script src="https://code.jquery.com/jquery-3.5.1.js"></script>
<script type="text/javascript">
  document.addEventListener('freeform-render-success', function (event) {
    event.preventDefault();
    $('#form-wrapper').html($('#custom-content').html());
  });
</script>
Redirect to another URL
If you'd like to redirect the form submitter to a different return URL, this can be handled a few different ways.
- Form Builder
- Template Parameter
- Template Input
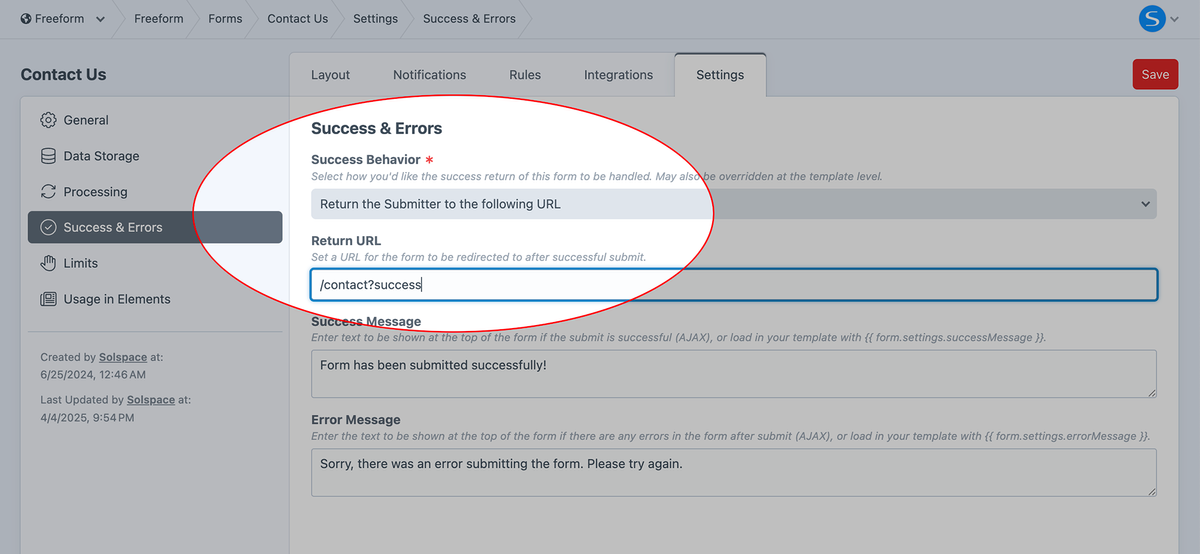
Go to the Success & Errors section under the Settings tab in the form builder.
For the Success Behavior setting, select the Redirect to another URL option.
For the Return URL setting, enter the URL path you'd like. The path is relative, so you may need to begin the URL with /.
You can also use any of the following:
{{ form.handle }}- handle of the form.{{ submission.token }}- the secure token created for the submission.{{ submission.id }}- the newly created unique submission ID in the URL. This (andsubmission.token) would allow you to use the Submissions query to display some or all of the users' submission on the success page.
If the returnUrl parameter is specified at the template level, Freeform will ignore the value set inside the form builder.
If you wish to set the return URL at the template level, you can do this by specifying the returnUrl parameter on the Form query or the form object.
{{ freeform.form("myFormHandle", {
  returnUrl: "/contact/success"
}).render() }}
You can add most variables such as form.handle, submission.id, submission.token as well as perform conditional checks, etc:
{{ freeform.form("myFormHandle", {
  returnUrl: "/{{ form.handle }}/{% if submission %}submissions/{{ submission.id }}/{% endif %}success"
}).render() }}
If you wish to have the return URL based upon the user's form selection, you can override the return URL manually with a hidden field or checkbox named
formReturnUrl, allowing for a more dynamic return URL dependent on the user's choice or action, as long as you hash the value ({{ 'whatever/my-url'|hash }}).
Field type Examples
- Dropdown
- Checkbox
- Hidden
<label for="return-select">
  Please choose...
</label>
<select name="formReturnUrl" id="return-select">
  <option value="{{ 'whatever/my-url'|hash }}">Option One</option>
  <option value="{{ 'whatever/my-other-url'|hash }}">Option Two</option>
  <option value="{{ 'whatever/something-else'|hash }}">Option Three</option>
</select>
<label for="return-checkbox">
  <input type="checkbox" name="formReturnUrl" id="return-checkbox" value="{{ 'whatever/my-url'|hash }}" />
  Some descriptive text about this checkbox
</label>
<input type="hidden" name="formReturnUrl" value="{{ 'whatever/my-url'|hash }}" />
Please keep in mind that if you're wanting to make the return path dependent on another field selection, or if you wish to know which "return option"
the user chose, using the formReturnUrl field does NOT collect and store the data selection. In this case, you would be best to use a real Freeform
field to collect the data, and then implement your own custom JS that calculates and/or copies another field's option values and inserts a return URL
into the formReturnUrl hidden field accordingly.
If you're using an automated rendering of the form, you'll need to consider how and where to add this into the formatting template. In most cases it might be best to add a conditional and pair this with the submit button or another field.
Redirect to an entryNew in 5.15+
If you'd like to redirect the form submitter to the configured URL path of a Craft Entry, this can be set inside the form builder.
- Form Builder
Go to the Success & Errors section under the Settings tab in the form builder.
For the Success Behavior setting, select the Redirect to an entry option.
For the Redirect Entry setting, select the Craft Entry you'd like users to be redirected to.
- The full URL configured for the entry's section is used.
- When using multi-site, the redirect will match the currently active site.
