Form BuilderImproved in 5.0+
What makes Freeform different from other form plugins is that it gives you full control to create simple or complex multi-page forms, and everything is at your fingertips in our elegant form builder. It has been expertly designed to minimize mouse movement and clicks. Freeform also features a long list of its own set of robust field types.
Overview
The Freeform form builder is an all-in-one interface that lets you take control of almost every aspect of your forms. Everything is at your fingertips.
The form builder is divided into 5 sections:
LayoutImproved in 5.0+
This is where you set up fields and pages, as well as design and configure the overall layout of the form.
Fields
The left column lists all available fields and field types to use for the form. Simply drag and drop any of these fields into the field layout in the right column.
- Search - you can search in Favorite fields and other forms to reuse existing fields.
- Favorites - includes all fields that have been saved to favorites, allowing you to quickly set up forms with common fields.
- Field Types - displays all available field types for the form (will differ between editions of Freeform). These can then be added to forms indefinitely.
- Property Editor - when you click on any field in the Layout (right column), a property editor will slide into the left column.
- To close the property editor, it can be done one of three ways:
- Press the
esckey on your keyboard - Click the
xat the top right - Click anywhere else on the page
- Press the
- To close the property editor, it can be done one of three ways:
- Bulk Insert OptionsNew in 5.5+ - paste in large lists of options into a textarea for options-based field types such as Checkboxes and Dropdowns.
- Separator - specify a separator (if applicable) used to separate the option label and value when using custom values for option labels. Options are: Pipe, Comma, Semicolon, Arrow and Space.
- Append Values - whether the options you're adding should add to the existing options configured or replace them.
- Bulk Editor - enter bulk values separated by new lines. If using custom values for option labels, you can provide a label and a value separated by a separator. For example, if you used
|you would write:Label|valueand set the Separator setting to Pipe.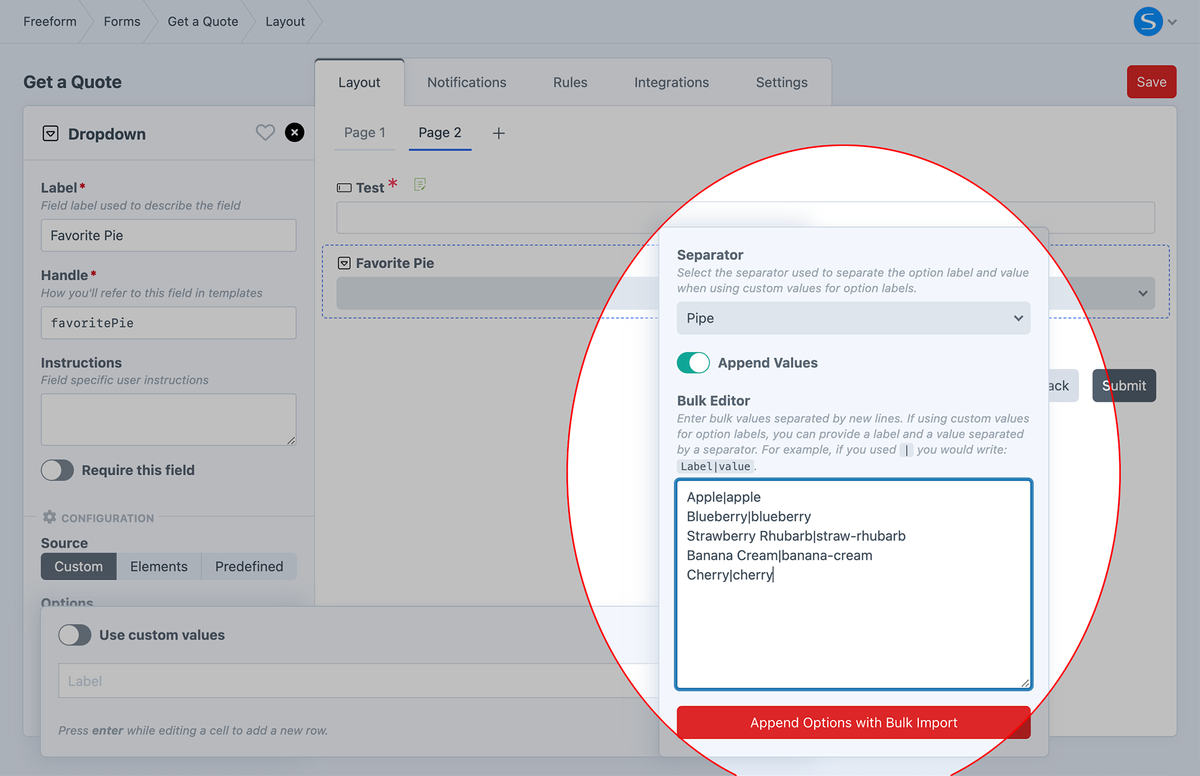
- Attributes Editor - add any attributes for the field and its container here, e.g.
data-my-attribute,id, etc.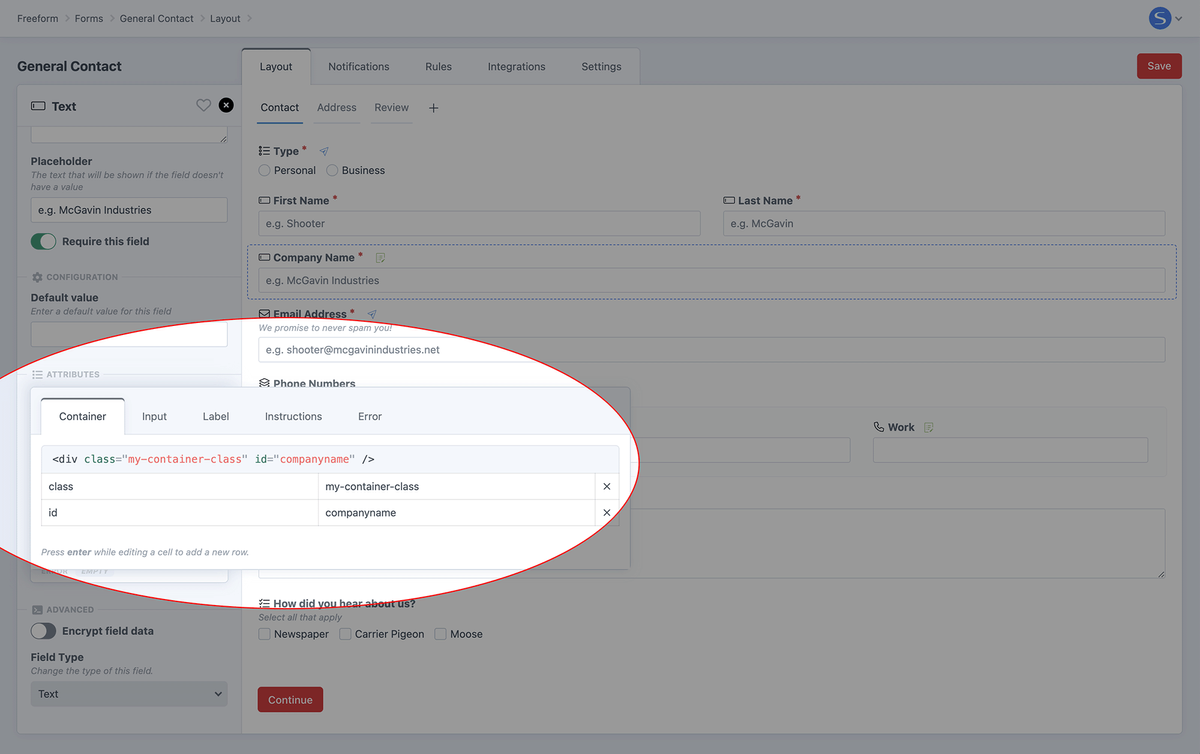
Preview
The right column is where you position the form fields for the form.
- Page Tabs - if you need to build a multi-page form, you can add and rename page tabs here.
- Pages can be renamed, re-arranged, and deleted.
- If you wish to move a field from one page to another, you can drag and drop the field onto the page tab of the page it should be moved to.
- Preview - this is where you will actively see an interactive live preview of what your form will look like (roughly - ultimately the form styling and appearance is up to your formatting template).
- Fields can be dragged and dropped from the left column anywhere into the Layout (right column).
- Freeform will automatically build rows and columns when you insert and rearrange fields.
- To configure fields, simply click on them and the property editor will slide into the left column.
- To remove a field from the layout, hover over the field and click the delete icon (trash) to the right.
- To duplicate a field in the form's layout, hover over the field and click the clone icon (pages) to the right. New in 5.14+
Email NotificationsImproved in 5.0+, 5.11+
This is where you configure email notifications for the form. Freeform allows you to set up 6 different kinds of email notifications, including at template level with the dynamicNotification parameter in your Form query.
Admin
Email notifications can be sent upon successful submit of the form to one or more admin email addresses.
In the Recipients area, add any email address(es) you'd like to receive an email notification each time the form is submitted successfully. If you need to specify more than one email address, hit Enter and additional email inputs will appear.
ConditionalProNew in 5.0+
Email notifications can be conditionally sent to one or more admin email addresses based on the contents and/or option selection of any Freeform field(s).
In the Recipients area, add any email address(es) you'd like to receive an email notification each time the form is submitted successfully when the following condition(s) are met. If you need to specify more than one email address, hit Enter and additional email inputs will appear.
User SelectLiteProRenamed & Improved for 5.0+
Email notifications can be sent to one or more pre-defined admin email addresses that are selected by the user filling out the form using any Dropdown, Checkboxes, Radios, Multi-Select field types. For example, you might have a Dropdown field that contains different departments for the user to address the email to.
In the Recipient Mapping area, add email address(es) for each corresponding option. If you need to specify more than one email address for an option, hit Enter and additional email inputs will appear.
You can also choose to specify a different email notification template for any or all options.
Be sure to set up your option fields as usual, and do not set email addresses as their options. That part is done inside the Notifications tab.
Email Fields
Email notifications can be sent to the user submitting the form as long as you're using the Email field type. This is often used to send an email confirmation for the user.
You can also enable "tell-a-friend" type forms by including additional Email fields in your form. This would then allow the submitter of the form to specify a friend's email address and have them receive an email notification as well.
Conditional RulesProImproved in 5.0+
This is where you can configure fields to show or hide based on the contents/selection of other fields, and even skip pages or submit the form based on the contents/selection of fields on a previous page.
Field Layout Map
For added convenience, Freeform includes a field map along with visual cues. This makes configuration faster and less confusing.
- A dark gray background shows the field or page that is currently being configured (in the right column).
- A green border means that the field, group or page has conditional rules configured for it.
- A green corner border at the top left means that the field, group or page is implicated in another field's conditional rules.
- E.g. If the Company Name field is configured to only show when the Type field is set to
Business, the Type field will display a green corner border.
- E.g. If the Company Name field is configured to only show when the Type field is set to
Adding Rules
Configuring rules for fields, groups and pages is straightforward:
- To set rules for a field, click on the field name in the left column.
- To set rules for a Group field, click on the group field name in the left column.
- To set rules for a page, click on the page name in the left column.
Please see the Conditional Rules documentation for more information about this feature.
IntegrationsImproved in 5.0+
This is where you can configure various types of integrations for your form. It will only show integrations that have been configured/setup in the Freeform Settings area.
Captchas
If a reCAPTCHA or hCaptcha integration is available, click on it in the left column. Once loaded in the right column, toggle the Use integration for this form switch ON and proceed to configuring settings as necessary.
Please see the Spam Protection documentation guide for more information about this feature.
CRM & Email MarketingPro
If any integrations are available, click on them in the left column. Once loaded in the right column, toggle the Use integration for this form switch ON and proceed to configuring settings and field mapping as necessary. It will differ slightly for each integration.
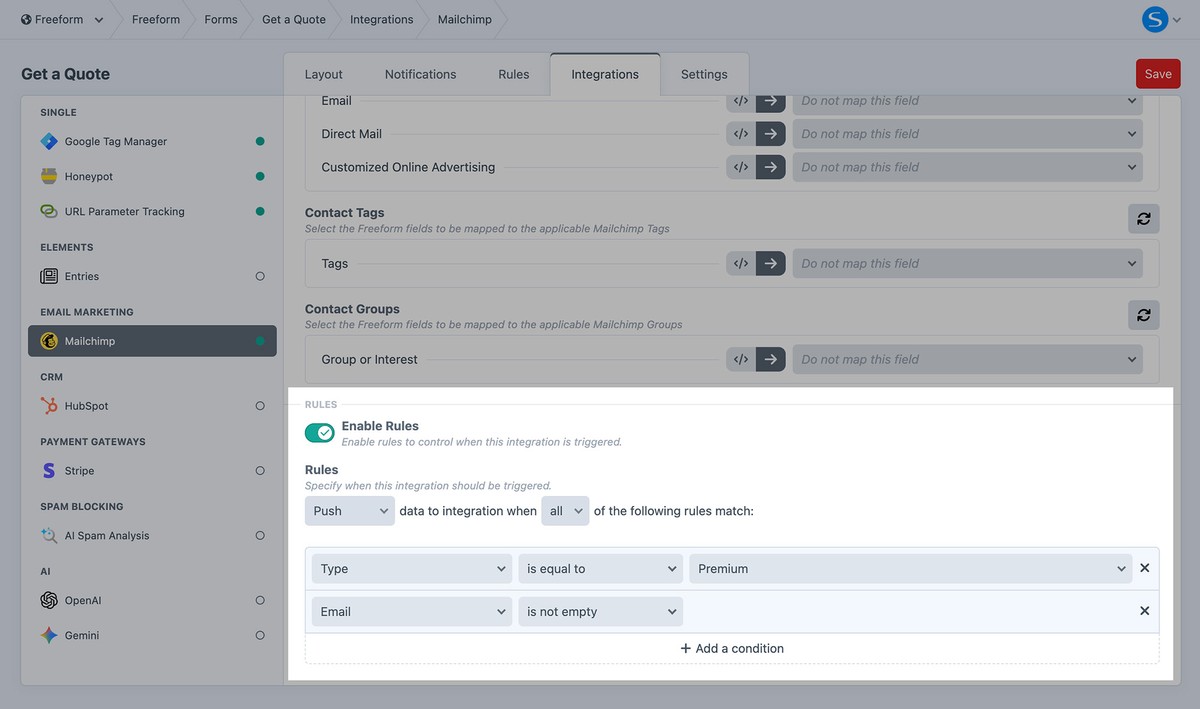
Conditional RulesNew in 5.12+
Add conditional logic to your Element integrations to control when submission data is sent. Create rules based on other field values (e.g., send only if Subscribe is checked or if Country is US).
PaymentsPro
If the Stripe Payments integration is available, click on it in the left column. Once loaded in the right column, toggle the Use integration for this form switch ON and proceed to configuring settings and field mapping as necessary. You will also need to add a Stripe Payments special field to the form layout.
Please see the Stripe Payments documentation guide for further instruction.
ElementsPro
This feature allows you to connect and map Freeform submission data to other Craft Elements such as Craft Entries and Craft Users. The possibilities are endless when you consider that it essentially allows you to easily create complex user registration forms or accept guest submitted content that maps to Craft entries for further management by site admins for publishing... or whatever else you can dream up!
If any Element integrations are available, click on them in the left column. Once loaded in the right columnm, toggle the Use integration for this form switch ON and proceed to configuring settings and field mapping as necessary.
Please see the Elements documentation for more information about this feature.
Conditional RulesNew in 5.12+
Add conditional logic to your CRM and Email Marketing integrations to control when submission data is sent. Create rules based on other field values (e.g., send only if Subscribe is checked or if Country is US).
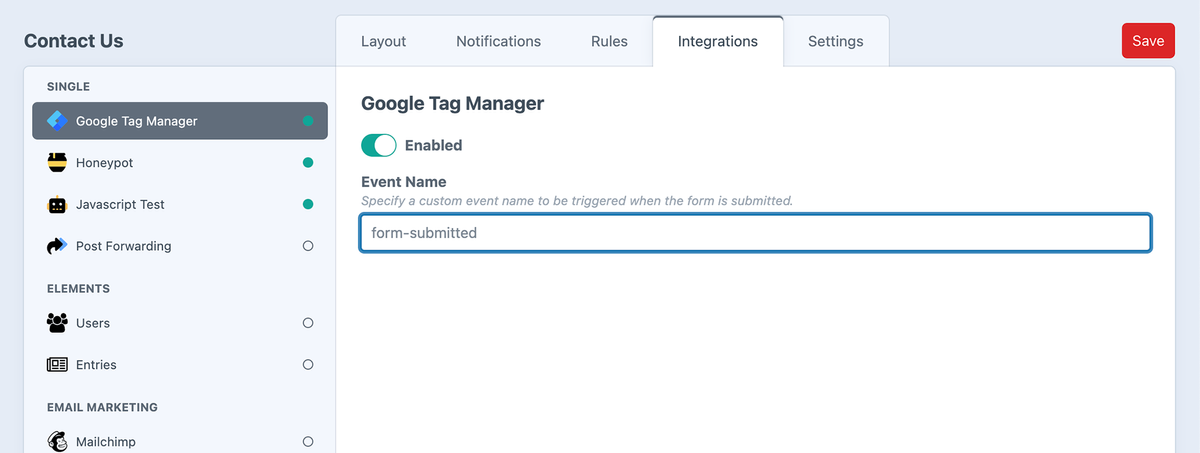
Google Tag ManagerLitePro
This allows you to enable Google Tag Manager to push successful form submission events to the data layer (when AJAX is enabled).
- Event Name - specify a custom event name that you wish to assign to a successful form submission.
- GTM Account ID - add this to the main integration settings if you want Google Tag Manager scripts added to your page by Freeform. Leave blank if you are adding your own GTM scripts.
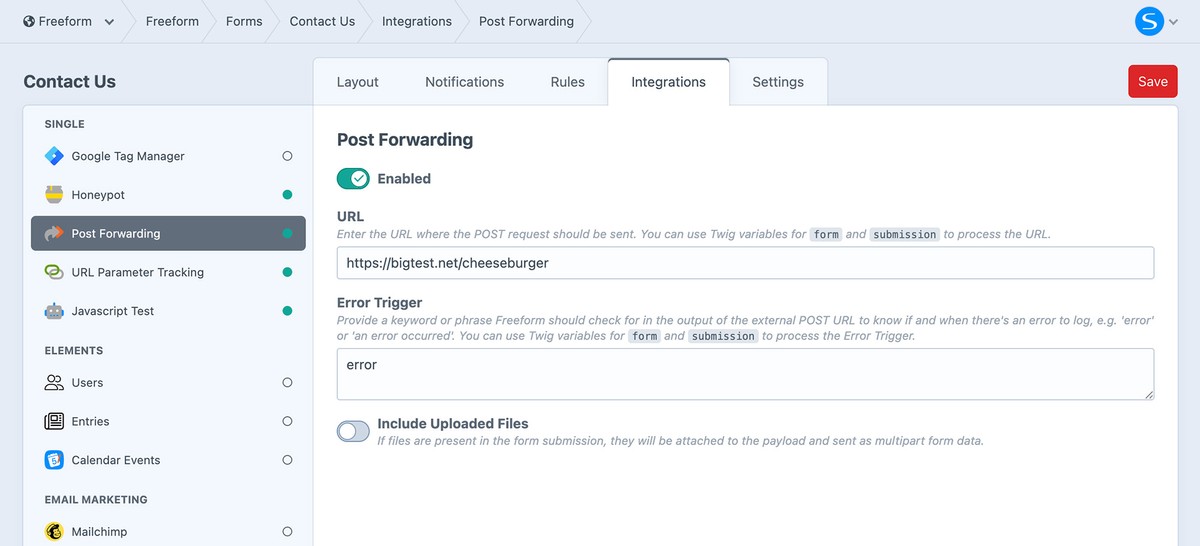
POST ForwardingPro
This allows your forms to automatically submit an extra POST to pass off submission data to an external API URL upon successful submit and validation of a form. This option is available for simpler and/or limited integrations as an alternative to our traditional Email Marketing and CRM integrations.
- URL - if you need to have the POST data of this form submitted to an external API, provide that custom URL here.
- Error Trigger - provide a keyword or phrase Freeform should check for in the output of the external POST URL to know if and when there's an error to log, e.g.
errororan error occurred. - Include Uploaded Files - if files are present in the form submission, they will be attached to the payload and sent as multipart form data.
Please see the POST Forwarding documentation for more information about this feature.
Settings
This is where you configure all settings and behaviors for the form.
Multi-Page FormsLitePro
Freeform allows for multi-page forms (a POST submit per page). When editing forms in the form builder, if you wish to rearrange pages, simply drag and drop the tabs. If you need to move a field from one page to another, drag and drop the field onto the page tab you'd like it to be moved to. It will then appear at the top of that page, and you can finish placing it where it should be on that page.
Important Notes
- Each page is submitted through
POST. - There is no unique URI segment per page at this time.
- Users cannot jump ahead to different pages, only forward and backward (if enabled) 1 page.
- Multi-page forms work with the built-in AJAX feature.
- Editing existing submissions via the front end in multi-page AJAX forms will currently not work correctly.
- To allow users to stop and return at a later time to complete the form, it will require use of the Save & Continue Later feature. Otherwise, the process has to be a continuous one, but the user has 3 hours before the form will timeout the submission.
- If an earlier page contains file upload field(s), files will actually be uploaded before the form is officially submitted. - After 3 hours (by default), Freeform will automatically remove any uploaded files if the form isn't finished being submitted. - If you require a longer period of time, we recommend using the File Upload Drag & Drop field and the Save & Continue Later feature.
Manual Submit Buttons in Multi-page Forms
When manually building submit buttons in multi-page forms, please refer to the Submit buttons guide for available options.
Form TypesPro
DashboardImproved in 5.6+, 5.9+
The Forms dashboard page offers extensive customization options. You can choose to display forms as cards or in a list table, customize the color of each form, set the display order of forms, create groups to organize forms, and archive forms that you don't want to appear on the dashboard.
Form CardsImproved in 5.9+
Forms can be displayed as cards, and you can manage, reorder, and group them.
Each form card will display the form name, handle, and description, along with the statistics showing the number of submissions, the number of spam submissions, number of saved forms (if applicable) and a color-coded chart at the bottom of the card indicating submission counts over the past 30 days. Additionally, you will have the ability to reorder, archive, duplicate, or delete the form.
Form ListNew in 5.6+
Forms can also be displayed as a table list, showing them in alphabetical order. The list view does not include the form groups feature.
Each row in the list will display the form name, handle, and description, along with the statistics showing the number of submissions, the number of spam submissions, and a color-coded chart indicating submission counts over the past 30 days. Additionally, you will have the ability to archive, duplicate, or delete the form.
Form GroupsProNew in 5.6+
To organize your form cards into groups, click on the Manage Forms Groups link located at the bottom right of the page. You can create multiple groups and rearrange both groups and forms. Any forms that are not assigned to a group will appear at the bottom under an Other group.
Archiving FormsLiteProNew in 5.5+
If you want to reduce clutter or hide old or unused forms, you can archive them by clicking the Archive icon on any form. The form will still be active on the website and can be viewed and edited in the form builder, but it will be moved to the bottom of the Forms dashboard page. You can unarchive forms at any time.
Errors & Update Notices
The top of the Forms dashboard page will conveniently let you know if something is wrong by displaying a banner indicating the number of errors that Freeform logged, if available, as well as Update Notices to keep you informed about issues that may specifically affect your site.
We respect your privacy, so this feature only pulls update notices from the Solspace.com site and does not and cannot send any information back. Solspace collects no information at all. The comparison check happens on your Freeform site environment, not on the Solspace site. This feature can also be disabled in the plugin settings.
Create Forms with AINew in 5.15+
Generate smart, fully structured forms in seconds from a simple AI prompt. Just describe what you need, and AI will build fields and layouts tailored to your use case.