


Stripe Payments ProImproved in 5.0+


Key Features
Freeform Payments uses the Payment Element approach from Stripe. The Payment Element is a UI component that accepts 40+ payment methods, validates input, and handles errors. This means that in addition to accepting credit cards, it will allow you to enable support for Stripe Link, Apple Pay, Google Pay, PayPal (within Europe), bank payments, deferred payments and many other options. Within minutes you can have anything from a form accepting donations to a membership registration form that has users pay for a subscription at any interval. The possibilities are endless!

40+ Payment Methods New!
Accept credit cards, Stripe Link, Apple Pay, Google Pay, PayPal (within Europe), bank payments, deferred payments and more! Learn more →

Secure Processing
All payment processing goes securely through Stripe. Freeform does not gain any access to any sensitive credit card or banking information.

Plug & Play
No technical knowledge is required to enable Stripe for your site. Follow our simple instructions and you'll be ready in minutes!

One-time Payments
Allow users to select or specify their own one-time payment. This could be for accepting donations, paying invoices, selling products and more!

Subscriptions
Allow users to select or configure their own recurring payments. This could be for memberships, donations, services and more!

Choice of Payment New!
Optionally allow users choose whether their payment is one-time, recurring, or done offline (not processed in your form).

Customizable
The Stripe field is highly customizable and even comes with a style guide and several built-in settings to control its appearance to match your site.

Map Freeform Data to Stripe
Easily map Freeform fields to Stripe fields to populate more customer information for the transaction/customer profile in Stripe.

Email Notifications
Send email notification to users about the success or failure and payment details of their payment transaction. No sensitive payment data will be included.
Requirements
The Freeform Stripe integration has the following requirements:
- Freeform Pro edition.
- If you're using another edition, you can switch/upgrade for the difference in price.
- Your own Stripe account.
- All API requests must be made over HTTPS. Testing can be done while using HTTP in Test Mode, however.
- Publicly accessible site is required to fully test or use Stripe.
- You can forego webhooks testing if you like, however, and use a non-public local dev site.
- When using on a local dev site, you will need to use a domain extension like
.testin order for Stripe to recognize it. - If using a local dev machine, you can work around this by using a service like ngrok. You can still access your site via the local dev URL, as long as the public version is working and Stripe is aware of it.
- When using multi-page forms, the Stripe Element field should be placed on the last page of the form.
- The built-in Success Behavior setting will be ignored, as a Success and Fail Redirect URL path will need to be specified.
Best Practices Recommended
The following are best practices when implementing the Stripe Element field to accept payments in your form.
Place Stripe field on Last Page
Stripe makes some strong recommendations and assumptions that the Stripe Payment Element will only be displayed once the payment amount is determined and payment is ready to be made (on the last page of a multi-page form). Therefore, it works best when its placed on the last page inside of a multi-page form.
If you choose not to do it this way, some Stripe behaviors are worked around to ensure the feature still works:
- The Stripe Payment Element field will not load if there is no payment amount entered or selected (when allowing the user to specify). When possible, either default the Amount field to something other than
0or empty OR ensure that the Amount field is on an earlier page than the Stripe Payment Element field so it is populated in time. If the Amount field is empty or0, the Stripe Payment Element field will display the message:Could not load payment element. - If allowing users to dynamically configure payment amount and/or interval when the Stripe Payment Element field is in the same page, the form will temporarily disable each time one of those fields is modified and the Stripe Payment Element field will reload.
- The Stripe.com dashboard will display an
IncompleteorCanceledtransaction each time the Stripe Payment Element field is loaded to a user and NOT completed or a payment amount or interval is changed while the Stripe field is present. To prevent this, avoid showing the Stripe Payment Element field and keep it on the last page of a multi-page form.
Conditional Rules for Multiple Payment Options
It's possible to allow multiple payment options inside the same form. For example, you could include both a one-time and subscription payment option in the same form. However, simply show and hide the Stripe payment fields with conditional rules.
Customization
The Stripe Payment Element allows for customization to fit your site's styles and needs.
Appearance
The appearance of the Stripe Payment Element can be customized to match your site. Choose a theme or update specific details.
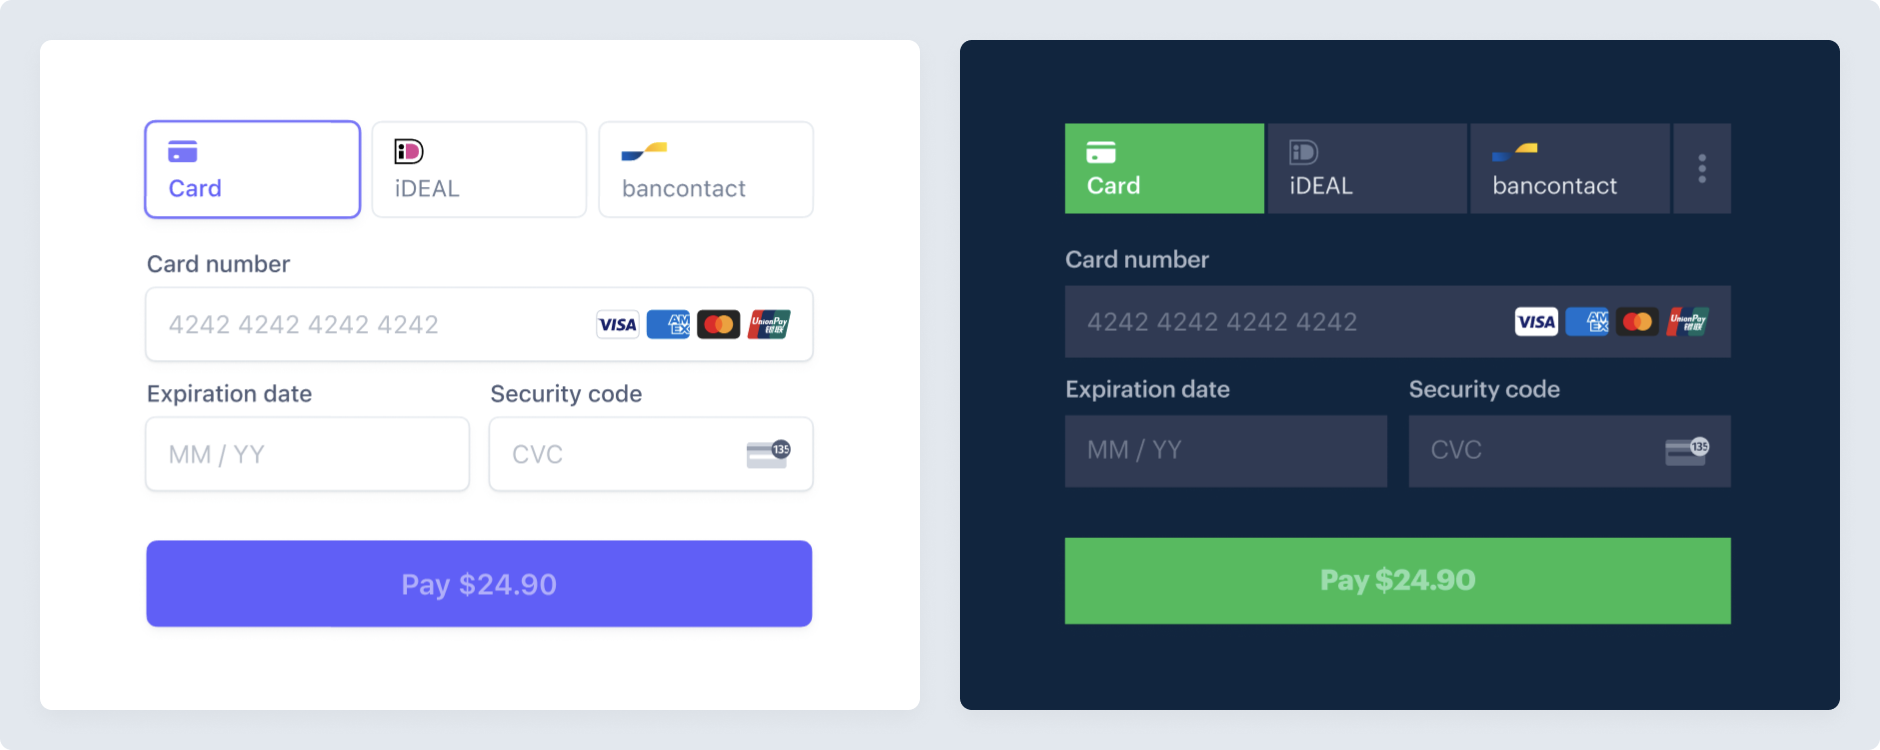
Layout Options
You can customize the Payment Element's layout to fit your desired flow. The following image is the same Payment Element rendered using different layout configurations.

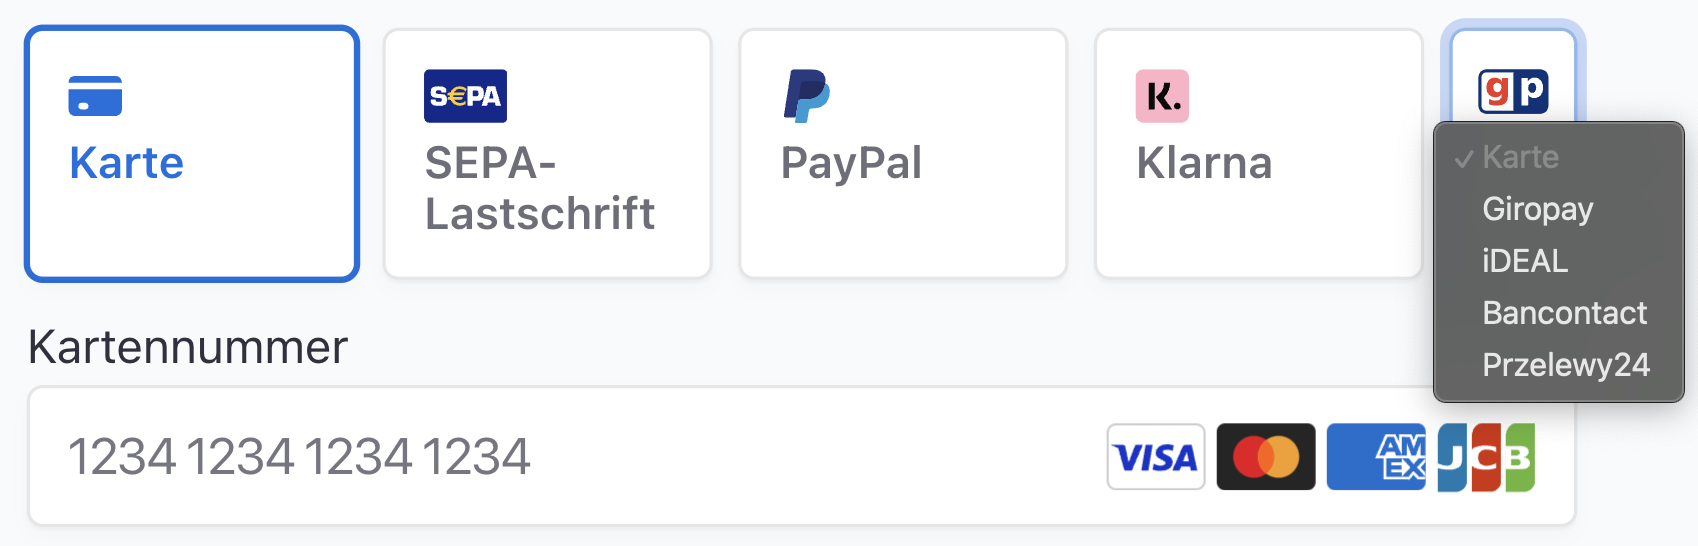
Payment Methods
The Payment Element displays every payment method that's activated and available (handled inside the Stripe.com website dashboard). It automatically sorts these payment methods by relevance to your customer's location and locale. For instance, if a customer in Germany is paying in EUR, they see all the active payment methods that accept EUR, starting with ones that are widely used in Germany.
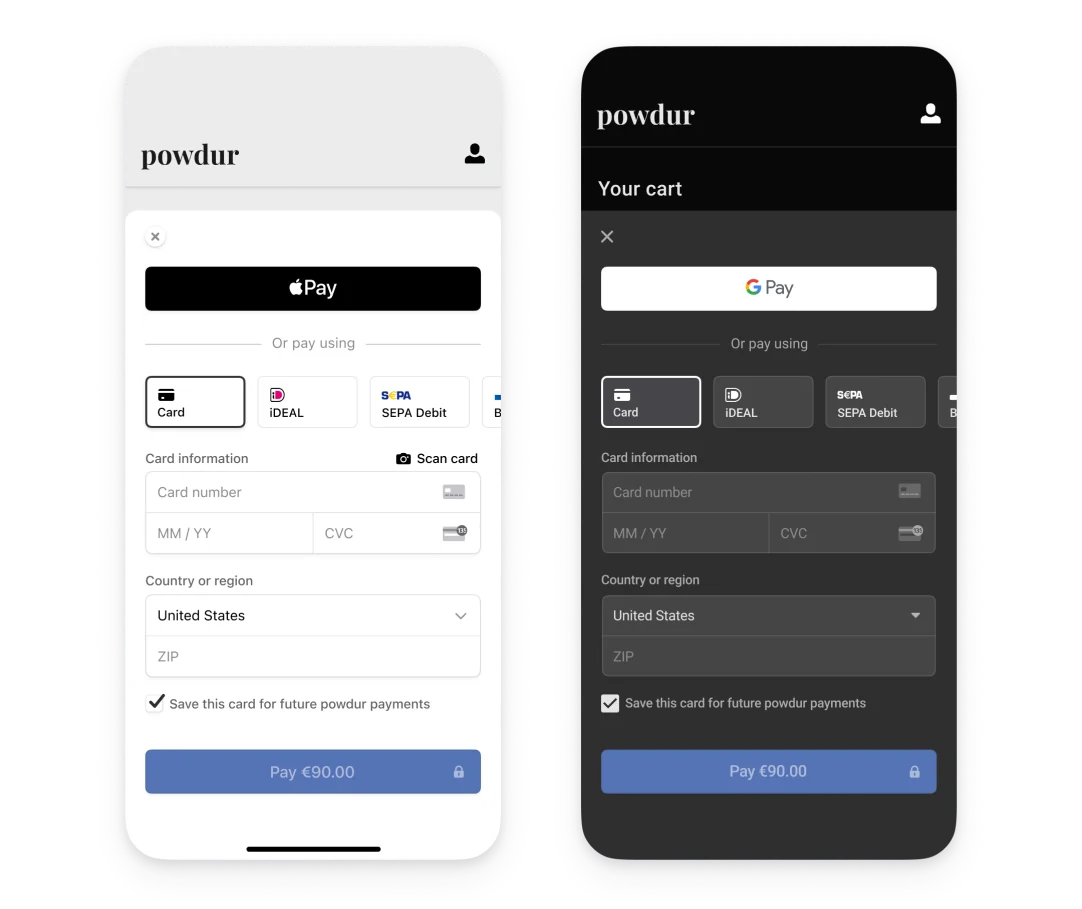
Apple Pay & Google Pay
The Stripe Payment Element includes built-in support for Apple Pay and Google Pay.
Setting Up
Setting up the Payment Gateway
The following instructions assume you already have a Stripe account. You can add the Stripe integration by doing the following:
- Go to the Payments section under Freeform Settings (Freeform → Settings → Payments).
- Click on the New Integration button at the top right.
- For Service Provider, select Stripe. Provide your integration a name in the Name and Handle fields.
Open up another browser tab and go to your Stripe account:
- On the top menu, click on the Developers button. On the next page click API Keys.
TIP
Stripe can be run in Live mode or Test mode. To toggle between Live and Test mode, click the Test mode toggle at the top of the page. When doing this, the Publishable key and Secret key will switch between live and test as well. We strongly recommend switching Stripe to Test mode first, and testing your site with those keys instead.

- Copy the token for Publishable key (e.g.
pk_test_fs7f6f8g8dfg68g68d76dgd8) and paste into the Public Key field inside Freeform. - Copy the token (click Reveal test key button to reveal) for Secret key (e.g.
sk_test_af7fa7gfdo78g6ddfg6d8d87) and paste into the Secret Key field inside Freeform.
TIP
Consider using an Environment Variable for these settings instead. Then, store Live keys on production and Test keys on local dev environments.
- Click on the Webhooks tab inside the Stripe Developers page.
- On the next page, click the + Add endpoint button.
- Configure the webhook:
- Copy the Webhook URL field value in Freeform (e.g.
http://my-precio.us/freeform/payment-webhooks/stripe?id=1) and paste it into the Endpoint URL setting. - For the Listen to setting, choose Events on your account.
- Click on the Select events button under the Select events to listen to setting. Add the following 4 events Freeform requires:
customer.subscription.createdcustomer.subscription.deletedinvoice.payment_failedinvoice.payment_succeeded
- Click the Add endpoint button to save it.
- Copy the Webhook URL field value in Freeform (e.g.
- On the next page inside Stripe account, click on the newly created endpoint URL.
- At the top of the next page, you'll see an item called Signing secret.
- Click on the Reveal button below it, and then copy the token (e.g.
whsec_dsf87d876sdf7g876fd8fasd9f7dsasd).
- Switch back to the Payment integration inside Freeform, and paste the Stripe Signing secret token into the Webhook Secret setting.
- Save the integration, and it should be ready.
Setting up the Form
Setting up your form to collect payments will generally consist of the following:
- Create a new form or open an existing one that will handle payments.
- Inside the Integrations tab, select the Stripe payment gateway.
- Toggle the Enable setting ON.
- Map your Freeform fields to Stripe's fields as necessary.
Additional settings
- Suppress Email Notifications & Integrations when Payments Fail
- Failed payments will still be stored as submissions, but enabling this will suppress email notifications and API integrations from being sent.
- Send Success Email from Stripe to Submitter
- When enabled, Freeform will pass off the submitter's email address to Stripe's
receipt_emailfield, automatically triggering Stripe to send a successful email notification.
- When enabled, Freeform will pass off the submitter's email address to Stripe's
- Inside the Layout tab, find Stripe Payment in the list of field types in the left column and drag it into the form layout.
- Click on the Stripe Payment field inside your field layout and configure it as necessary in the property editor left column.
- Label & Handle
- Required
TIP
The Stripe field does NOT have to be required. However, if you wish to go this route, it is better to have a field that allows the user to select paying in the form or "Paying offline", etc and then use Conditional Rules to show and hide the Stripe field.
- Select the integration for the field.
- Description - enter a description for the payment. You can use the
formandsubmissionobject in Twig. - Payment Type - choose between Single (one-time) or Subscription (recurring).
- If Single:
- Payment Amount - choose between Fixed or Dynamic.
- If Dynamic, choose the field that will contain the amount.
- Option values should contain an integer only, e.g.
49or89.95.
- Payment Currency - choose a currency for payments.
- Payment Amount - choose between Fixed or Dynamic.
- If Subscription:
- Subscription Interval - choose between Static or Dynamic.
- If Dynamic, choose the field that will contain the interval options.
- Options values should only be
year,month,week,day.
- Options values should only be
- If Dynamic, choose the field that will contain the interval options.
- Subscription Interval Count - choose between Static or Dynamic.
- If Dynamic, choose the field that will contain the interval count options, e.g.
1,2, etc.
- If Dynamic, choose the field that will contain the interval count options, e.g.
- Payment Amount - choose between Fixed or Dynamic.
- If Dynamic, choose the field that will contain the amount.
- Option values should contain an integer only, e.g.
49or89.95.
- Payment Currency - choose a currency for payments.
- Subscription Interval - choose between Static or Dynamic.
- If Single:
- Successful Payment Redirect - specify a URL to be redirected to upon successful payment.
- Failed Payment Redirect - specify a URL to be redirected to upon failed payment.
TIP
The built-in Success Behavior setting will be ignored, as a Success and Fail Redirect URL path will need to be specified in these settings.
- Theme - choose from
Default,Dark, orMinimal.- This can be used as a starting point. Check out the style guide to make further adjustments to the styles.
- Layout - choose between
Tabs,Accordian with radio buttons, andAccordian without radio buttons. - Floating Labels - toggle whether or not the labels should be inside the field inputs.
To send a success or fail email notification to the site Admin or the customer from Freeform, configure an email notification inside the Notifications tab in the form builder.
Example template code might look something like this:
<p>The following submission came in on {{ dateCreated|date('l, F j, Y \\a\\t g:ia') }}.</p>
<h2>Customer Information</h2>
<ul>
    {% for field in allFields %}
        <li>{{ field.label }}: {{ field.labelAsString }}</li>
    {% endfor %}
</ul>
<hr />
{% if payments %}
    <h2>Payment Information</h2>
    <ul>
        <li>Amount: ${{ payments.amount }} {{ payments.currency }}</li>
        <li>
            Card ending in: •••• {{ payments.card }}
            ({{ payments.status }}{% if payments.errorMessage|length %} - {{ payments.errorMessage }}{% endif %})
        </li>
    {% if payments.type == "subscription" %}
        <li>{{ payments.planName }} ({{ payments.interval }})</li>
    {% endif %}
    </ul>
{% endif %}
2
3
4
5
6
7
8
9
10
11
12
13
14
15
16
17
18
19
20
21
Configuring Payment Methods
The Stripe Payment Element allows you to accept 40+ payment methods, including credit cards, Stripe Link, Apple Pay, Google Pay, PayPal (within Europe), bank payments, deferred payments and more!
To enable additional payment methods for your site, visit the Stripe Payment Methods settings area (Stripe → Settings Cog icon (top right nav) → Settings → Payment Methods (under Payments section)).
Some payment methods such as Apple Pay require domains to be registered. You can configure this by visiting the Stripe Payment Method Domains settings area (Stripe → Settings Cog icon (top right nav) → Settings → Payment Method Domains (under Payments section)).
Mapping Payment Data to Other Integrations
Stripe payment data is available to map to other integrations such as CRMs as well. The following options will become available to map:
- Amount
- Interval
- Interval Count
- Card Token
- Card Last 4
- Card Type
- Stripe Charge ID
- Stripe Customer ID
- Stripe Transaction Hash
Templating
The following properties are available for use inside email notification templates and front end templates (Submission object):
payments.amount- Outputs the amount paid/subscribed to for the submission, e.g.
49.95.
- Outputs the amount paid/subscribed to for the submission, e.g.
payments.interval(subscription only)- Outputs the payment interval subscribed to for the submission, e.g.
biweekly.
- Outputs the payment interval subscribed to for the submission, e.g.
payments.currency- Outputs the currency used for the submission, e.g.
usd.
- Outputs the currency used for the submission, e.g.
payments.type- Outputs the payment type for the submission, e.g.
singleorsubscription.
- Outputs the payment type for the submission, e.g.
payments.status- Outputs the payment status to for the submission, e.g.
paid,active,failed.
- Outputs the payment status to for the submission, e.g.
payments.errorMessage- Outputs the payment error message for the submission, e.g.
Your card was declined..{% if payments.errorMessage|length %}{{ payments.errorMessage }}{% endif %}
- Outputs the payment error message for the submission, e.g.
payments.card- Outputs the last 4 digits of the users credit card used for payment in the submission, e.g.
4242.
- Outputs the last 4 digits of the users credit card used for payment in the submission, e.g.
payments.planName(subscription only)- Outputs the subscription plan name subscribed to for the submission, e.g.
Enterprise Plan.
- Outputs the subscription plan name subscribed to for the submission, e.g.
payments.id- Outputs the Freeform payment ID for the submission, e.g.
142.
- Outputs the Freeform payment ID for the submission, e.g.
payments.resourceId- Outputs the Gateway payment ID for the submission, e.g.
ch_1Cx4JHKLrxLeQvTQ5y4ei1K8.
- Outputs the Gateway payment ID for the submission, e.g.
payments.gateway- Outputs the name of the integration for the payment gateway used for the submission, e.g.
My Stripe Integration.
- Outputs the name of the integration for the payment gateway used for the submission, e.g.
payments.unsubscribeUrl(subscription only)- Outputs an unsubscribe URL for the user to self-unsubscribe from a subscription, e.g.
http://my-precio.us/freeform/payment-subscription/37/cancel/2ba40891782393e3ff1ae9c3b2b6786d5318eabc.
- Outputs an unsubscribe URL for the user to self-unsubscribe from a subscription, e.g.
Submission Data Example
For displaying the submission data, your code may look something like this:
{% set submissionId = craft.app.request.segment(3) %}
{% set payments = freeform.payments(submissionId) %}
{% if payments %}
    <h2>Payment Information</h2>
    <ul>
        <li>Amount: ${{ payments.amount }} {{ payments.currency }}</li>
        <li>
            Card ending in: •••• {{ payments.card }}
            ({{ payments.status }}{% if payments.errorMessage|length %} - {{ payments.errorMessage }}{% endif %})
        </li>
    {% if payments.type == "subscription" %}
        <li>{{ payments.planName }} ({{ payments.interval }})</li>
    {% endif %}
    </ul>
{% endif %}
2
3
4
5
6
7
8
9
10
11
12
13
14
15
Rendering Stripe Payment Element in your Form Improved in 5.0+
For rendering the Stripe Payment Element field inside your form, it simply works like any other field:
{{ field.render() }}
If you wish to make any customization to the handling of Stripe payment fields, you can use the Template Overrides feature and do this at form level:
{{ form.renderTag({
    fields: {
        "@stripe": {
            attributes: {
                input: {
                    "-class": "form-control bg-dark-subtle",
                },
            },
        },
    },
}) }}
2
3
4
5
6
7
8
9
10
11
Or at the field level by using a conditional like this:
...
{% elseif field.type == "stripe" %}`
    {{ field.render({
        attributes: {
            input: {
                class: "my-stripe-class",
            },
        },
    }) }}
{% else %}
...
2
3
4
5
6
7
8
9
10
11
Styling the Stripe Element Improved in 5.0+
To style the Stripe Payment Element, you'll need to use the Freeform JS Plugin and apply Stripe's Appearance API variables to the elementOptions and paymentOptions listeners.
elementOptions.appearance
Below is a list of commonly used variables. See Stripe documentation for a complete list of other variables.
| Variable | Description |
|---|---|
fontFamily | The font family used throughout Elements. Elements supports custom fonts by passing the fonts option to the Elements group. |
fontSizeBase | The font size that's set on the root of the Element. By default, other font size variables like fontSizeXs or fontSizeSm are scaled from this value using rem units. |
spacingUnit | The base spacing unit that all other spacing is derived from. Increase or decrease this value to make your layout more or less spacious. |
borderRadius | The border radius used for tabs, inputs, and other components in the Element. |
colorPrimary | A primary color used throughout the Element. Set this to your primary brand color. |
colorBackground | The color used for the background of inputs, tabs, and other components in the Element. |
colorText | The default text color used in the Element. |
colorDanger | A color used to indicate errors or destructive actions in the Element. |
The rules option is a map of CSS-like selectors to CSS properties, allowing granular customization of individual components. After defining your theme and variables, use rules to seamlessly integrate Elements to match the design of your site.
The selector for a rule can target any of the public class names in the Element, as well as the supported states, pseudo-classes, and pseudo-elements for each class. For example, the following are valid selectors:
.Tab,.Label,.Input.Tab:focus.Input--invalid,.Label--invalid.Input::placeholder
The following are not valid selectors:
.p-SomePrivateClass,img- only public class names can be targeted.Tab .TabLabel- ancestor-descendant relationships in selectors are unsupported.Tab--invalid- the.Tabclass does not support the--invalidstate
See Stripe documentation for a complete list.
paymentOptions.layout
Options for creating the Payment Element.
| Property | Description |
|---|---|
defaultCollapsed: true | Controls if the Payment Element renders in a collapsed state (where no payment method is selected by default). When you leave this undefined, Stripe renders the experience that it determines will have the best conversion. |
radios: true | Renders each Payment Method with a radio input next to its logo. The radios visually indicate the current selection of the Payment Element. This property is only applicable to the accordion layout. |
spacedAccordionItems: false | When true, the Payment Methods render as standalone buttons with space in between them. This property is only applicable to the accordion layout. |
visibleAccordionItemsCount: 2 | Sets the max number of Payment Methods visible before using the "More" button to hide additional Payment Methods. Set this value to 0 to disable the "More" button and render all available Payment Methods. Default is 5. This property is only applicable to the accordion layout. |
Full documentation can be found here: Stripe Elements Appearance API
Example
<script>
var form = document.querySelector('[data-id="{{ form.anchor }}"]');
if (form) {
    form.addEventListener("freeform-stripe-appearance", function (event) {
        event.elementOptions.appearance = Object.assign(
            event.elementOptions.appearance,
            {
                variables: {
                    colorPrimary: "#0d6efd",
                    fontFamily: "-apple-system,BlinkMacSystemFont,\"Segoe UI\",Roboto,\"Helvetica Neue\",Arial,sans-serif,\"Apple Color Emoji\",\"Segoe UI Emoji\",\"Segoe UI Symbol\",\"Noto Color Emoji\"",
                    fontSizeBase: "16px",
                    spacingUnit: "0.2em",
                    tabSpacing: "10px",
                    gridColumnSpacing: "20px",
                    gridRowSpacing: "20px",
                    colorText: "#eaeaea",
                    colorBackground: "#1d1f23",
                    colorDanger: "#dc3545",
                    borderRadius: "5px",
                },
                rules: {
                    '.Tab, .Input': {
                        border: '1px solid #6c757d',
                        boxShadow: 'none',
                    },
                    '.Tab:focus, .Input:focus': {
                        border: '1px solid #0b5ed7',
                        boxShadow: 'none',
                        outline: '0',
                        transition: 'border-color .15s ease-in-out',
                    },
                    '.Label': {
                        fontSize: '16px',
                        fontWeight: '400',
                    },
                },
            }
        );
        event.paymentOptions.layout = Object.assign(
            event.paymentOptions.layout,
            {
                defaultCollapsed: true,
                visibleAccordionItemsCount: 3,
            }
        );
    });
}
</script>
2
3
4
5
6
7
8
9
10
11
12
13
14
15
16
17
18
19
20
21
22
23
24
25
26
27
28
29
30
31
32
33
34
35
36
37
38
39
40
41
42
43
44
45
46
47
48
Email Notifications
Example Usage
<p>The following submission came in on {{ dateCreated|date('l, F j, Y \\a\\t g:ia') }}.</p>
<h2>Customer Information</h2>
<ul>
    {% for field in allFields %}
        <li>{{ field.label }}: {{ field.labelAsString }}</li>
    {% endfor %}
</ul>
<hr />
{% if payments %}
    <h2>Payment Information</h2>
    <ul>
        <li>Amount: ${{ payments.amount }} {{ payments.currency }}</li>
        <li>
            Card ending in: •••• {{ payments.card }}
            ({{ payments.status }}{% if payments.errorMessage|length %} - {{ payments.errorMessage }}{% endif %})
        </li>
    {% if payments.type == "subscription" %}
        <li>{{ payments.planName }} ({{ payments.interval }})</li>
    {% endif %}
    </ul>
{% endif %}
2
3
4
5
6
7
8
9
10
11
12
13
14
15
16
17
18
19
20
21
Testing
It's best practice to test out your form and Payments implementation to ensure it works correctly and as expected. Please visit the Stripe Testing documentation for a full reference of how to test your forms and get a feel for how it handles failures, etc. Also be sure to toggle the Test mode button in the Stripe account area for testing, as Stripe will provide you with a different set of keys for testing mode.
For quick reference, here is some general testing data:
Testing successful purchases
- Card:
4242424242424242 - Expiry Date: (anything in future, e.g.
2/42) - CVC: (any 3 digits, e.g.
242)
Testing for errors and responses
- Card:
4000000000000002- Charge is declined with a card_declined code. - Card:
4100000000000019- Results in a charge with a risk level of highest. The charge is blocked as it's considered fraudulent. - Card:
4000002760003184- Test for Strong Customer Authentication (SCA).- A full list of card numbers for more scenarios can be found in the Stripe documentation.
Troubleshooting
When viewing Payment individual submissions in the control panel, the right side of the page will display a more detailed error for failed payments. If you think there might be an issue with Freeform or your implementation, this may help you look for patterns and troubleshoot.