


This document is for an older version of
Freeform
.
View latest version →
Freeform Payments Requires Payments plugin (+59) Freeform 2.3.0+
Easily collect payments with your Freeform forms! Allow clients to pay invoices, subscribe to a service, pay for memberships and more!
Overview
WARNING
The Stripe payment gateway requires HTTPS. You can however, use in Testing mode with HTTP.
Freeform Payments allows you to easily collect payments and subscriptions from your site users. It ties into either edition of Freeform (Lite or Pro, but one is required) and extends its functionality to include payment processing. Adding payment processing to forms in Freeform is so intuitive and simple to do. Within minutes you can have anything from a form accepting donations to a membership registration form that has users pay for a subscription at any interval level. Currently there is only an integration with Stripe, but we hope to have others in the future.
Freeform Payments accepts two different types of payments: Single one-time payments, and recurring Subscriptions. The necessary credit card fields will integrate seamlessly into your form and appear like the rest of your fields (and can be styled as such). For an even smoother feel for error handling and validation, try using AJAX with your form.
You are given full control to have a set payment option, allow users to fully customize their payment plan, and anything inbetween! Use regular Freeform fields for regular submission data (e.g. name, email address, etc) and even for setting payment amount, plan choices, interval choices, currency choices. Then use the Payments property editor to map your fields to Stripe accordingly.
Payments data can be displayed in templates and email notifications, as well as viewed inside the Freeform control panel when viewing list of submissions and single submission view. You can view the payment status, selected subscription plan and more. Users can self-cancel subscriptions (from Freeform generated email notifications) and admins can cancel subscriptions directly from the Freeform control panel. As subscriptions are cancelled, admins can view the auto-updated payment status directly inside Freeform as well.
It's important to note that Freeform does not store any sensitive credit card data, except for the last 4 digits of the credit card number.
Requirements
Freeform Payments has the following requirements:
- Craft 3.0+ and its server requirements
- Freeform 2.3+ Lite or Pro edition
- Stripe account (only payment gateway currently)
- All API requests must be made over HTTPS
- Can be tested in Test Mode while using HTTP however.
- Publicly accessible site to fully test or use Stripe.
- You can forego webhooks testing (Payments success/fail email notifications, payment status future updates) if you like however, and use non-public local dev site.
TIP
If you need to include more than 1 Payments-enabled form inside the same template or page, be sure to apply the fieldIdPrefix: "myprefix-" parameter to your forms so that the Stripe fields (and others) have unique ID's on the same page, which is required to work correctly. Freeform Payments will also automatically only load one instance of Stripe JS in the page.
Setting up the Payment Gateway
TIP
To fully test or use the webhooks part of Stripe payment gateway (Payments success/fail email notifications, payment status future updates), your site needs to be accessible publicly. If you're using a local dev machine, you can work around this by using a service like ngrok. You can still access your site via the local dev URL, as long as the public version is working and Stripe is aware of it.
The following instructions assume you already have a Stripe account. You can add the Stripe integration by doing the following:
- Go to the Payment Gateways section under Freeform Settings (Freeform -> Settings -> Payment Gateways). Click on the New Payment Gateway Integration button at the top right.
- For Service Provider, select Stripe. Provide your integration a name in the Name and Handle fields.
- Open up another browser tab and go to your Stripe account:
- On the left nav menu, click on Developer, then click API Keys.
- Copy the LIVE token for Publishable key (e.g.
pk_live_fs7f6f8g8dfg68g68d76dgd8) and paste into the Public Key (Live) field inside Freeform. - Copy the LIVE token (click Reveal live key token button to reveal) for Secret key (e.g.
sk_live_af7fa7gfdo78g6ddfg6d8d87) and paste into the Secret Key (Live) field inside Freeform. - Toggle the View test data link at the bottom left corner in Stripe account area (or top right in API Key page) to allow testing your setup. Stripe will provide you with a different set of keys for testing mode.
- Copy the TEST token for Publishable key (e.g.
pk_test_fs7f6f8g8dfg68g68d76dgd8) and paste into the Public Key (Test) field inside Freeform. - Copy the TEST token (click Reveal live key token button to reveal) for Secret key (e.g.
sk_test_af7fa7gfdo78g6ddfg6d8d87) and paste into the Secret Key (Test) field inside Freeform. - Enable the LIVE mode toggle whenever you are ready to have your Payment forms go live. Freeform Payments will then switch to using the LIVE Stripe API tokens.
- Save the integration inside Freeform. Then, reopen the integration you just created by clicking on it in Freeform.
- Copy the URL value inside the Webhook URL field in Freeform (e.g.
http://my-precio.us/freeform/payment-webhooks/stripe?id=1). - Switch back to your Stripe account browser tab:
- On the left nav menu, click on Developer, then click Webhooks.
- Under the Endpoints receiving events from your account section (you may see more endpoint options), click the + Add endpoint button.
- Paste the webhook URL you copied from Freeform into the modal window that pops up.
- You can likely use latest or default option for Webhook version without any consequence.
- Select Send all event types option for Filter event setting.
- Click Add Endpoint button to save it.
- On the next page inside Stripe account, click on the newly created Endpoint URL.
- At the bottom of the next page, you'll see a section titled Signing secret.
- Click on the Click to reveal button, and then copy the token (e.g.
whsec_dsf87d876sdf7g876fd8fasd9f7dsasd).
- Switch back to the Payment Gateway integration inside Freeform, and paste the Signing secret token into the Webhook Secret setting.
- Save the integration again, and it should be ready.
Testing the Webhook Connection
You can test to see if the Webhook connection is valid by clicking on the Send test webhook button inside the Webhooks section of Stripe (Stripe -> Developer -> Webhooks click your Endpoint URL). Under the Event type dropdown, keep it on something Freeform Payments doesn't use like account.application.authorized, and then click Send test webhook button at bottom left. It should display Test webhook sent successfully at bottom, along with Response: None.
Setting up the Form
Setting up your form to collect payments will generally consist of the following:
- Setup form with all the regular fields you need.
- At the top left, drag and drop the Credit Card special field into your form.
- Specify layout type (2 rows or 3 rows).
- Adjust any labels and placeholders as necessary.
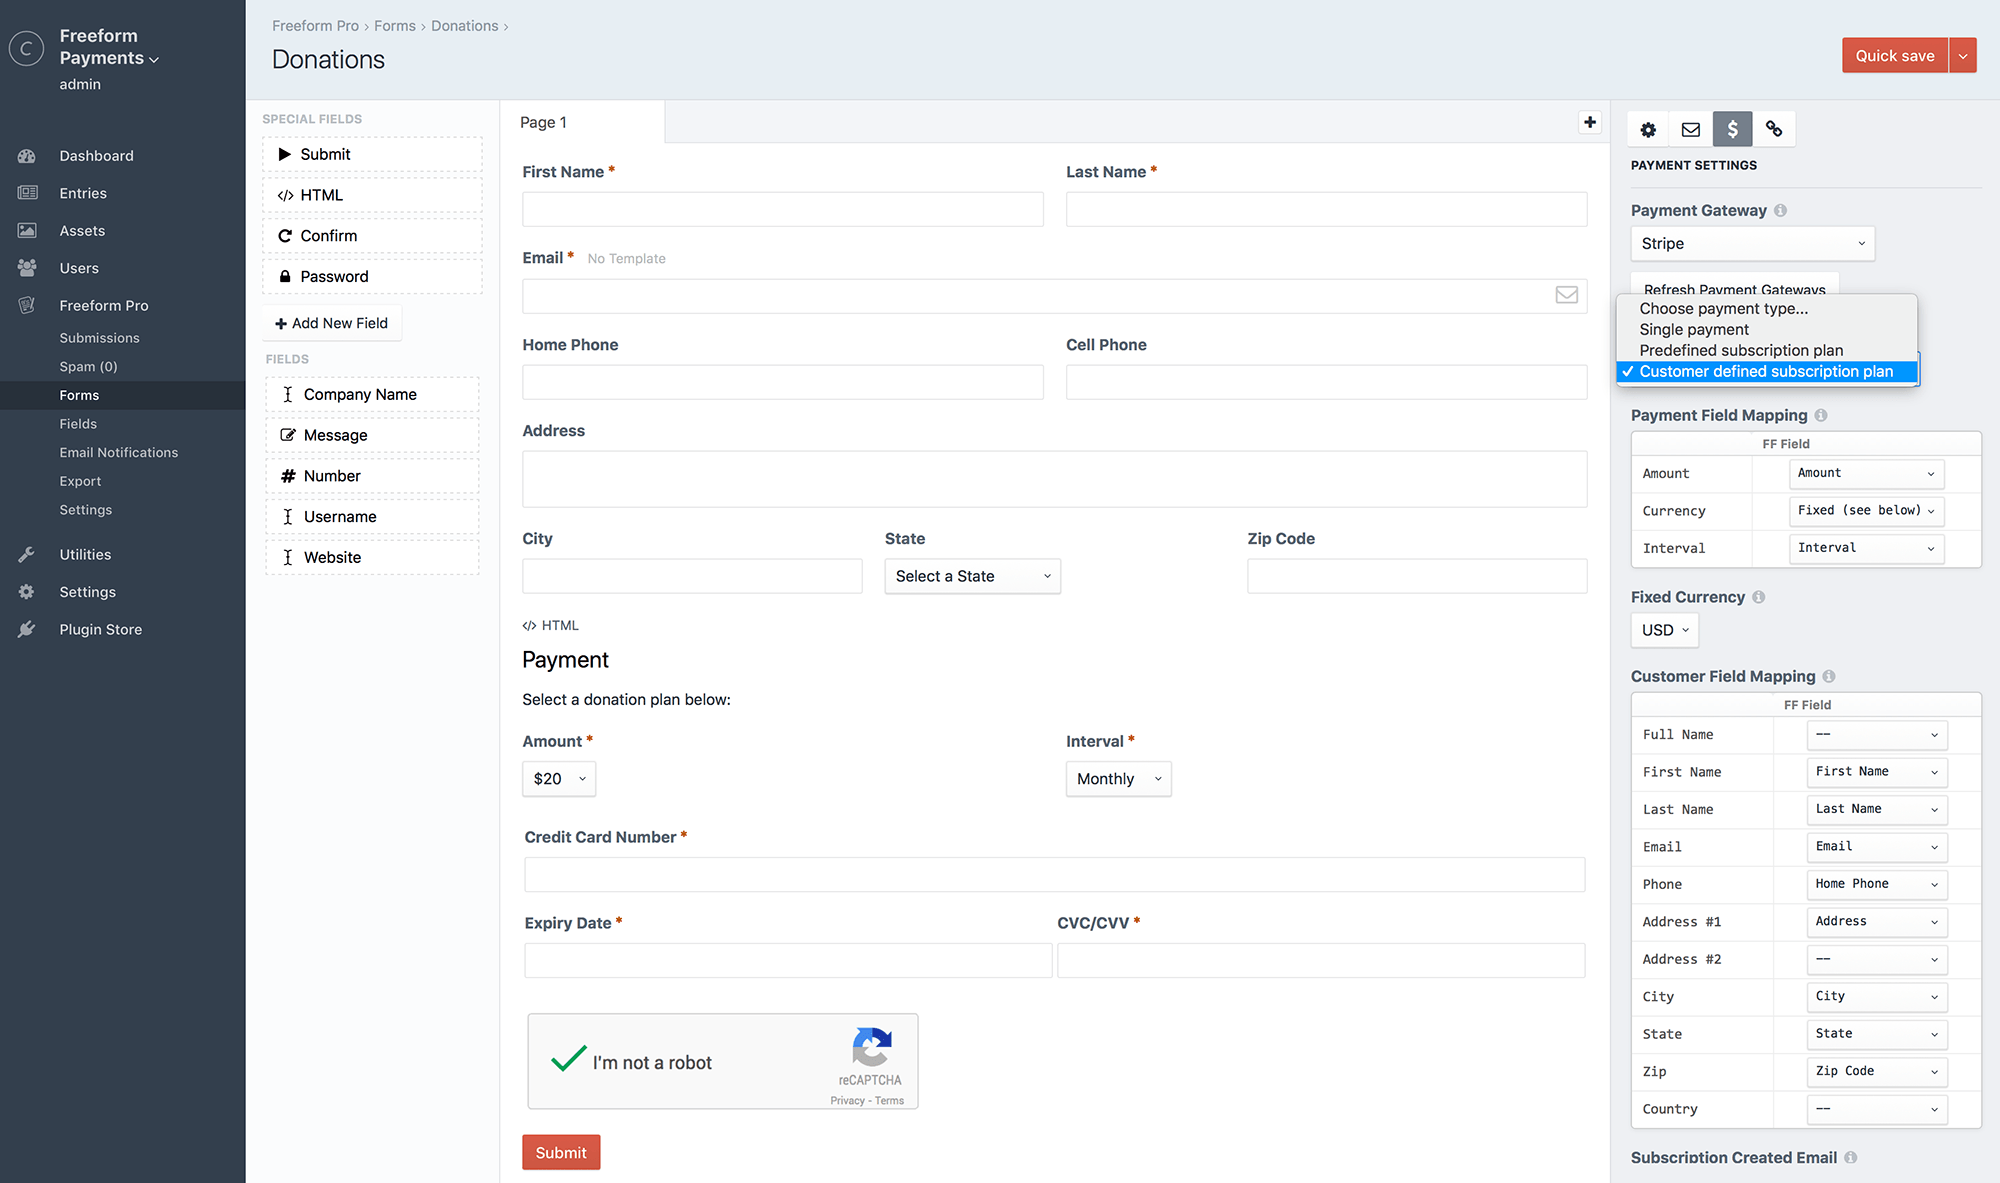
- At the top right of the page, click on the Payments ($) button.
- Select a gateway from the Payment Gateway dropdown.
- In the Payment Type dropdown, select one of the following:
- Single payment - collect a single payment from the user
- Predefined subscription plan - subscribe the user to a subscription payment plan
- Customer defined subscription plan - allow the user to create their own subscription plan
- In the Payment Field Mapping table, you'll see options depending on which Payment Type selected.
- Amount (applies to 'Single payment' and 'Customer defined subscription plan' options)
- Select a regular Freeform field of the Select or Radio fieldtype with predefined options for the user to choose an amount.
- Predefined option values should contain an integer only, e.g.
49or89.95.
- Predefined option values should contain an integer only, e.g.
- Select a regular Freeform field of the Number fieldtype for the user to enter their own amount.
- Option values should contain an integer only, e.g.
49or89.95.
- Option values should contain an integer only, e.g.
- Select Fixed if you wish to have a single predefined value for users to pay.
- In the Fixed Amount field below, enter an integer value, e.g.
49or89.95.
- In the Fixed Amount field below, enter an integer value, e.g.
- Select a regular Freeform field of the Select or Radio fieldtype with predefined options for the user to choose an amount.
- Currency (applies to 'Single payment' and 'Customer defined subscription plan' options)
- Select a regular Freeform field of the Select or Radio fieldtype with predefined options for the user to choose a currency.
- Predefined option values should contain 3 letter lower case currency code, e.g.
usdoreur.
- Predefined option values should contain 3 letter lower case currency code, e.g.
- Select Fixed if you wish to have a single predefined currency option.
- In the Fixed Currency field below, select a currency for your form, e.g.
USD.
- In the Fixed Currency field below, select a currency for your form, e.g.
- Select a regular Freeform field of the Select or Radio fieldtype with predefined options for the user to choose a currency.
- Interval (applies to 'Customer defined subscription plan' option only)
- Select a regular Freeform field of the Select or Radio fieldtype with predefined options for the user to choose payment frequency.
- Predefined option values should contain a valid interval value only, e.g.
biweeklyormonthly. Valid options are:dailyweeklybiweeklymonthlyannually
- Predefined option values should contain a valid interval value only, e.g.
- Select Fixed if you wish to have a single predefined payment interval.
- In the Fixed Interval field below, select a payment interval, e.g.
Monthly.
- In the Fixed Interval field below, select a payment interval, e.g.
- Select a regular Freeform field of the Select or Radio fieldtype with predefined options for the user to choose payment frequency.
- Plan (applies to 'Predefined subscription plan' option only)
- Select a regular Freeform field of the Select or Radio fieldtype with predefined payment plans as options for the user to choose.
- Predefined option values should contain a valid subscription ID name value only, e.g.
plan_DNVlbcZQCtNzOsorfreeform_userRegistration_100_usd_biweekly.
- Predefined option values should contain a valid subscription ID name value only, e.g.
- Select Fixed if you wish to have a single predefined subscription plan.
- In the Fixed Subscription Plan field below, select a subscription from the list.
- If you wish to create a new plan directly from Freeform, click the Add new plan button.
- Select a regular Freeform field of the Select or Radio fieldtype with predefined payment plans as options for the user to choose.
- Amount (applies to 'Single payment' and 'Customer defined subscription plan' options)
- In the Customer Field Mapping table, map Freeform fields to the payment gateway's fields.
- It's not required to map to all fields.
- Choose Full Name if you use a single Freeform field to collect customer names. Choose First Name and Last Name if you use two different Freeform fields to collect customer names. Do not map to both, Freeform will figure things out if you choose 1 approach only.
- Set up the payment gateway email notifications (optionally trigger notifications to the email address entered into the Freeform field that is mapped to the payment gateway Email field in the Customer Field Mapping table):
- Subscription Created Email (Subscription type only) - notification of successful subscription
- Subscription Ended Email (Subscription type only) - notification of subscription being cancelled
- Payment Succeeded Email - notification of successful payment
- For subscriptions, this will be sent for each subsequent successful transaction at the scheduled interval.
- Payment Failed Email - notification of unsuccessful payment
- For subscriptions, this will be sent for any unsuccessful subsequent transaction at the scheduled interval.
- Email notifications can still be sent to the submitter the traditional way too - by clicking on the Email field and setting up an email notification template for it in the property editor.
- Save your form and try it out!
Usage in Templates & Notifications
The following properties are available for use inside email notification templates and front end templates (Submission object):
payments.amount#- Outputs the amount paid/subscribed to for the submission, e.g.
49.95.
- Outputs the amount paid/subscribed to for the submission, e.g.
payments.interval(subscription only) #- Outputs the payment interval subscribed to for the submission, e.g.
biweekly.
- Outputs the payment interval subscribed to for the submission, e.g.
payments.currency#- Outputs the currency used for the submission, e.g.
usd.
- Outputs the currency used for the submission, e.g.
payments.type#- Outputs the payment type for the submission, e.g.
singleorsubscription.
- Outputs the payment type for the submission, e.g.
payments.status#- Outputs the payment status to for the submission, e.g.
paid,active,failed.
- Outputs the payment status to for the submission, e.g.
payments.errorMessage#- Outputs the payment error message for the submission, e.g.
Your card was declined..{% if payments.errorMessage|length %}{{ payments.errorMessage }}{% endif %}
- Outputs the payment error message for the submission, e.g.
payments.card#- Outputs the last 4 digits of the users credit card used for payment in the submission, e.g.
4242.
- Outputs the last 4 digits of the users credit card used for payment in the submission, e.g.
payments.planName(subscription only) #- Outputs the subscription plan name subscribed to for the submission, e.g.
Enterprise Plan.
- Outputs the subscription plan name subscribed to for the submission, e.g.
payments.id#- Outputs the Freeform payment ID for the submission, e.g.
142.
- Outputs the Freeform payment ID for the submission, e.g.
payments.resourceId#- Outputs the Gateway payment ID for the submission, e.g.
ch_1Cx4JHKLrxLeQvTQ5y4ei1K8.
- Outputs the Gateway payment ID for the submission, e.g.
payments.gateway#- Outputs the name of the integration for the payment gateway used for the submission, e.g.
My Stripe Integration.
- Outputs the name of the integration for the payment gateway used for the submission, e.g.
payments.unsubscribeUrl(subscription only) #- Outputs an unsubscribe URL for the user to self-unsubscribe from a subscription, e.g.
http://my-precio.us/freeform/payment-subscription/37/cancel/2ba40891782393e3ff1ae9c3b2b6786d5318eabc.
- Outputs an unsubscribe URL for the user to self-unsubscribe from a subscription, e.g.
Example usage in Templates
For displaying the submission data, your code may look something like this:
{% set submissionId = craft.app.request.segment(3) %}
{% set payments = craft.freeformPayments.payments(submissionId) %}
{% if payments %}
  <h2>Payment Information</h2>
  <ul>
    <li>Amount: ${{ payments.amount }} {{ payments.currency }}</li>
    <li>Card ending in: •••• {{ payments.card }} ({{ payments.status }}{% if payments.errorMessage|length %} - {{ payments.errorMessage }}{% endif %})</li>
  {% if payments.type == "subscription" %}
    <li>{{ payments.planName }} ({{ payments.interval }})</li>
  {% endif %}
  </ul>
{% endif %}
2
3
4
5
6
7
8
9
10
11
12
For rendering the Credit Card fields inside your form, you'll need to include something like the following:
{% if field.layoutRows is defined %}
  {% for layoutRow in field.layoutRows %}
    <div class="freeform-row {{ form.customAttributes.rowClass }}">
      {% for layoutField in layoutRow %}
        <div class="{{ columnClass }}">
          {{ layoutField.render({
            class: "freeform-input",
            labelClass: "freeform-label" ~ (layoutField.inputOnly ? " freeform-input-only-label" : "") ~ (layoutField.required ? " freeform-required" : ""),
            errorClass: "freeform-errors",
            instructionsClass: "freeform-instructions",
          }) }}
        </div>
      {% endfor %}
    </div>
  {% endfor %}
{% endif %}
2
3
4
5
6
7
8
9
10
11
12
13
14
15
16
You can also perform a check with {% elseif field.type == "cc_details" %}.
For styling the Stripe credit card fields in the form, you'll have to style the parent <div> that encompasses the Stripe iframe and not the inputs. For example (using the Flexbox example in Solspace demo templates):
.freeform-row .freeform-column .freeform-input.StripeElement {
  -moz-appearance: textfield;
  -webkit-appearance: textfield;
  appearance: textfield;
  border: 1px solid;
  padding-top: 5px;
  height: 26px
}
2
3
4
5
6
7
8
Example usage in Notifications
<p>The following submission came in on {{ dateCreated|date('l, F j, Y \\a\\t g:ia') }}.</p>
<h2>Customer Information</h2>
<ul>
{% for field in allFields %}
  <li>{{ field.label }}: {{ field.getValueAsString() }}</li>
{% endfor %}
</ul>
<hr />
{% if payments %}
  <h2>Payment Information</h2>
  <ul>
    <li>Amount: ${{ payments.amount }} {{ payments.currency }}</li>
    <li>Card ending in: •••• {{ payments.card }} ({{ payments.status }}{% if payments.errorMessage|length %} - {{ payments.errorMessage }}{% endif %})</li>
  {% if payments.type == "subscription" %}
    <li>{{ payments.planName }} ({{ payments.interval }})</li>
  {% endif %}
  </ul>
{% endif %}
2
3
4
5
6
7
8
9
10
11
12
13
14
15
16
17
18
Testing
It's best practice to test out your form and Payments implementation to ensure it works correctly and as expected. Please visit the Stripe Testing documentation for a full reference of how to test your forms and get a feel for how it handles failures, etc. Also be sure to toggle the View test data link at the bottom left corner in Stripe account area for testing, as Stripe will provide you with a different set of keys for testing mode. When you switch back to live, be sure to update your Freeform integration with the LIVE Stripe API tokens.
For quick reference, here is some general testing data:
Testing successful purchases
- Card:
4242424242424242 - Expiry Date: (anything in future, e.g.
242) - CVC: (any 3 digits, e.g.
242)
Testing for errors and responses
- Card:
4000000000000002- Charge is declined with a card_declined code. - Card:
4100000000000019- Results in a charge with a risk level of highest. The charge is blocked as it's considered fraudulent.
Mapping Payments Data to CRM
Freeform Payments data is available to map to CRM integrations as well. The following options will be available to map to your CRM fields:
- Amount
- Interval
- Interval Count
- Card Token
- Card Last 4
- Card Type
- Stripe Charge ID
- Stripe Customer ID
- Stripe Transaction Hash