


Getting Started
The purpose of this section of the documentation is to give you an overview of Express Forms, and help you get started out with a basic form. We highly recommend you install the built-in demo that comes with Express Forms, as it will create a demo form, email notification template and install a working set of demo templates that will allow you to see everything in action with just a couple clicks. If you still have questions about Express Forms after that, continue reading below...
Compare
It might be odd to start this way, but if you're familiar with Craft's Contact Form and/or Freeform and are wondering what the key differences between them and Express Forms (built by makers of Freeform) are, it may be helpful to start out by understanding those differences first. If not, you may wish to skip this and proceed to the overview.
TIP
For a full feature comparison chart, please check out our Compare documentation resource.
Craft's Contact Form
One of the main purposes of Express Forms was to meet and exceed Craft's Contact Form plugin and all other helper plugins functionality, and offer it all as a single, combined and robust plugin that works for every site. It's quite messy to consider that for a usable basic form setup, you might need to install up to 5 helper plugins in addition to Craft's Contact Form plugin.
So to clarify, Express Forms for the most part can perform all of the existing functionality available with Craft's Contact Form plugin (and available helper plugins), and goes steps further to exceed those features/approaches, wrapped up in a single, intuitive and reliable plugin.
Some key additional features available to Express Forms are:
- Intuitive form builder interface
- Unlimited email notification types and options
- Export submission data
- as
CSV - as
Excel,XML,JSONPro
- as
- Built-in API integrations for popular CRM's and Mailing Lists Pro
- Extensively developer friendly (can even easily add features and settings to the control panel)
Freeform
Given the popularity of Freeform and that Express Forms was built by the makers of Freeform, Express Forms will have many similarities in approaches. However, the two are still fairly different products.
- Freeform is a premium plugin that is rich with many "convenience" features. Express Forms assumes less, and tries to stay out of your way and let you construct forms in a more manual way. This might be more refreshing for developers that wish to bring all of their own CSS/JS, etc to the table. Freeform can equally be customized, but it also makes assumptions that you're wanting to construct the form layout inside the CP and are looking for automating your form building and conveniently provides things like built-in premium field types such as Date/Time fields with date/time pickers, Rating star fields, etc.
- Express Forms has a CP form builder as well, but it's simplified. Think of it as not quite what you get in Freeform, but a step up from Craft's field layout editor. It allows you to create fields and control which order they appear in (at least within CP and optional automation of form rendering in templates), configure form settings, setup email notifications and API integrations.
- While Freeform has a global set of fields that are shared across all forms, Express Forms has a different set of fields per form. This allows you to effortlessly add fields to forms as you go without having to think too much about reusing.
- Fields in Express Forms are not entirely pre-defined in the CP like they are/can be in Freeform. Freeform will give you the ability to create ready-to-go fields like Checkbox groups and Select fields, allowing you to setup and validate option values and labels for each, where Express Forms will have you add a field inside the form builder, but you'll specify (or load from another source) its options directly inside your template. While you can specify whether a field is
text,textarea,email,hidden,checkboxorfile, there are no specific options forselect,multi-select,radiosorcheckboxes. In this case, you would use the general purpose Options field type, though you may also wish to usetextfield type for Select and Radio fields however, since they would just be storing a single value, and not an array which Options is equipped to do. - Email Notifications and API Integrations setup and approach between the two are fairly similar for the most part.
- Freeform has a wide variety of developer events and is very customizable, but with Express Forms, we went the extra mile to closely follow Craft's approaches and extensively make it developer-friendly. Custom development should be much more intuitive, and you'll find that you can even do things like adding settings to the Express Forms control panel, etc.
- The price. Express Forms is offered with less bells and whistles at a lower price so that it is more affordable for sites with simpler needs, or big needs but are willing to put in the extra work.
Overview
Express Forms is a light-weight form building plugin for Craft CMS. It's designed to be a more simplified approach to building and managing forms than a more powerful solution like Freeform.
It contains every feature available to the native Craft Contact Form and more. It's simple and intuitive to use, and doesn't get in your way if you're wanting to build simple forms or handle your own templating and custom features. It was developed with the developer in mind too, so it's highly extendable. The available Pro edition also contains several built-in popular API integrations.
Fields
Fields in Express Forms are dynamic to each form (not global, not reused), allowing you to quickly just add and remove fields as you need them.
While Express Forms does not offer a full drag and drop field layout editor like Freeform, it does have a loose concept of field types. In many cases, rendering of forms will be fairly manual in front end templates, but by having some concept of field types allows Express Forms to better handle and validate data, as well as help to partially automate template rendering.
Fields will contain no option to pre-define field choice options and contain few settings, as those will be handled inside the templates. However, the following is a list of all field types Express Forms is aware of:
TIP
For more information about field types in Express Forms, please see the Field Types documentation.
Forms
All of your created forms are displayed as "cards". You can rearrange the placement of these to an order that makes most sense to you. These cards will include form information, stats, management and ability to export submissions. Clicking on the name of the form will bring you into the Form Builder interface that allows you to setup and configure the form.
Form Builder
The heart of Express Forms is its intuitive Form Builder area, where everything is at your fingertips. Its simplistic approach is designed to stay out of your way but still be fun and intuitive to use. Everything you setup for your forms is done here. This includes form setup, fields and validation, field layout/order, email notification setup and API integrations. Email Notification Templates are managed elsewhere, but they are applied to the form here.
TIP
For more information about the form builder in Express Forms, please see the Form Builder documentation.
Email Notifications
Express Forms allows you to send email notifications upon submittal of a form. They are global and can be reused for multiple forms, saving you time when you are managing many forms.
You may create as many email notification templates as you wish. Email Notifications are all stored as files in the Craft Templates directory, but are also able to be edited through the Express Forms control panel. Once you have the Template Directory Path setting set correctly, you'll see a list of all available templates. You can manage these file directly, or you can add/edit/remove these through the control panel.
The following types of notifications are available:
TIP
For more information about email notification templates in Express Forms, please see the Email Notifications documentation.
Spam Protection
Express Forms offers some different options for handling spam protection to help with the management of form submissions.
The following spam protection options available are:
- Javascript Honeypot
- Express Forms includes its own built-in Javascript Honeypot spam protection feature. This is enabled by default, but can be disabled in the Express Forms Settings area. If enabled, you can then specify the behavior Express Forms takes when a spammy submission is detected with the Spam Protection Behavior setting.
- reCAPTCHA
- Express Forms includes built-in support for reCAPTCHA v2. To enable, visit the Spam section of the Settings area (Express Forms -> Settings -> Spam).
TIP
For more information about spam protection in Express Forms, please see the Spam Protection documentation.
API Integrations
Several API integrations are available in Pro edition. Express Forms is very extendable, so if you wish to build your own API integration, you're certainly able to do so, and it doesn't require having the Pro edition.
The following built-in API integrations available are:
TIP
For more information about API integrations in Express Forms, please see the API Integrations documentation.
Quick Start
The below guide will help walk you through creating a basic "Contact" form for your site to get you started with Express Forms. The video below is a similar (though not exact) but visual overview of creating and displaying forms.
Create a new form
- Go to the Forms area inside Express Forms. Click on the New Form button at the top right of the page.
- You'll now see a form building interface where you can begin creating and configuring your form.
- Add a name for your form, e.g.
Contact. - In the Submission Title setting, supply the field name(s) you wish to generate your submission titles, e.g.
{name} - {subject}.
Add fields to the form
- In the right column, begin adding fields to your form. Freeform will include a partially setup field by default. Let's rename that field to
Name(with handlename) and set it to be required. - Add more fields to the form by clicking the Add Field button. For the purpose of this example, let's add:
Email(with handleemail) and set the field type to be Email and required.Subject(with handlesubject) and set the field type to be Text and required.Message(with handlemessage) and set the field type to be Textarea and required.How did you hear about us?(with handlehowHeard) and set the field type to be Options and NOT required.Attach a File(with handleattachment) and set the field type to be File and NOT required, limit 1 file.
- Save the form.
Render the form in your template
- Go to your Craft Templates directory and add a new template file called
test.htmllocated at./templates/express-forms/test.html. - Add the following template code to your template:
<html>
<head>
</head>
<body>

{# Macro for Field Errors #}
{% macro renderErrors(field) %}
    {% if field.hasErrors and field.errors|length %}
        <ul class="errors">
            {% for error in field.errors %}
                <li>{{ error|t }}</li>
            {% enfor %}
        </ul>
    {% endif %}
{% endmacro %}
{% import _self as forms %}

{% set form = craft.expressforms.form("contact") %}

{# Flash Success #}
{% if form.submittedSuccessfully %}
    <div class="success">
        {{ "Form has been submitted successfully!"|t }}
    </div>
{% endif %}

{# General Error Handling #}
{% if not form.valid %}
    <div class="alert alert-danger" role="alert">
        {{ "Error! Please review the form and try submitting again."|t }}
        {% if form.errors|length %}
            <ul>
                {% for error in form.errors %}
                    <li>{{ error|t }}</li>
                {% endfor %}
            </ul>
        {% endif %}
    </div>
{% endif %}

{# Automatically set Form tags with Return, CSRF and Honeypot (if enabled) #}
{{ form.openTag({ return: 'express-forms/test' }) }}
    <p>
        <label for="name">{{ form.fields.name.label }}</label>
        <input id="name" type="text" name="name" value="{{ form.fields.name.value }}">
        {{ forms.renderErrors(form.fields.name) }}
    </p>
    <p>
        <label for="email">{{ form.fields.email.label }}</label>
        <input id="email" type="email" name="email" value="{{ form.fields.email.value }}">
        {{ forms.renderErrors(form.fields.email) }}
    </p>
    <p>
        <label for="subject">{{ form.fields.subject.label }}</label>
        <input id="subject" type="text" name="subject" value="{{ form.fields.subject.value }}">
        {{ forms.renderErrors(form.fields.subject) }}
    </p>
    <p>
        <label for="message">{{ form.fields.message.label }}</label>
        <textarea rows="10" cols="40" id="message" name="message">{{ form.fields.message.value }}</textarea>
        {{ forms.renderErrors(form.fields.message) }}
    </p>
    <p>
        <label>{{ form.fields.howHeard.label }}</label>
        <div class="checkbox">
        <label>
            <input type="checkbox" name="howHeard[]" value="newspaper"{{ "newspaper" in form.fields.howHeard.value ? " checked" }} /> Newspaper
        </label>
        <label>
            <input type="checkbox" name="howHeard[]" value="radio"{{ "radio" in form.fields.howHeard.value ? " checked" }} /> Radio
        </label>
        <label>
            <input type="checkbox" name="howHeard[]" value="friend"{{ "friend" in form.fields.howHeard.value ? " checked" }} /> Friend
        </label>
        </div>
        {{ forms.renderErrors(form.fields.howHeard) }}
    </p>
    <p>
        <label for="attachment">{{ form.fields.attachment.label }}</label>
        <input type="file" name="attachment[]" multiple>
        {{ forms.renderErrors(form.fields.attachment) }}
    </p>
    <input type="submit" value="Submit">
{{ form.closeTag }}

</body>
</html>
2
3
4
5
6
7
8
9
10
11
12
13
14
15
16
17
18
19
20
21
22
23
24
25
26
27
28
29
30
31
32
33
34
35
36
37
38
39
40
41
42
43
44
45
46
47
48
49
50
51
52
53
54
55
56
57
58
59
60
61
62
63
64
65
66
67
68
69
70
71
72
73
74
75
76
77
78
79
80
81
82
83
84
85
86
87
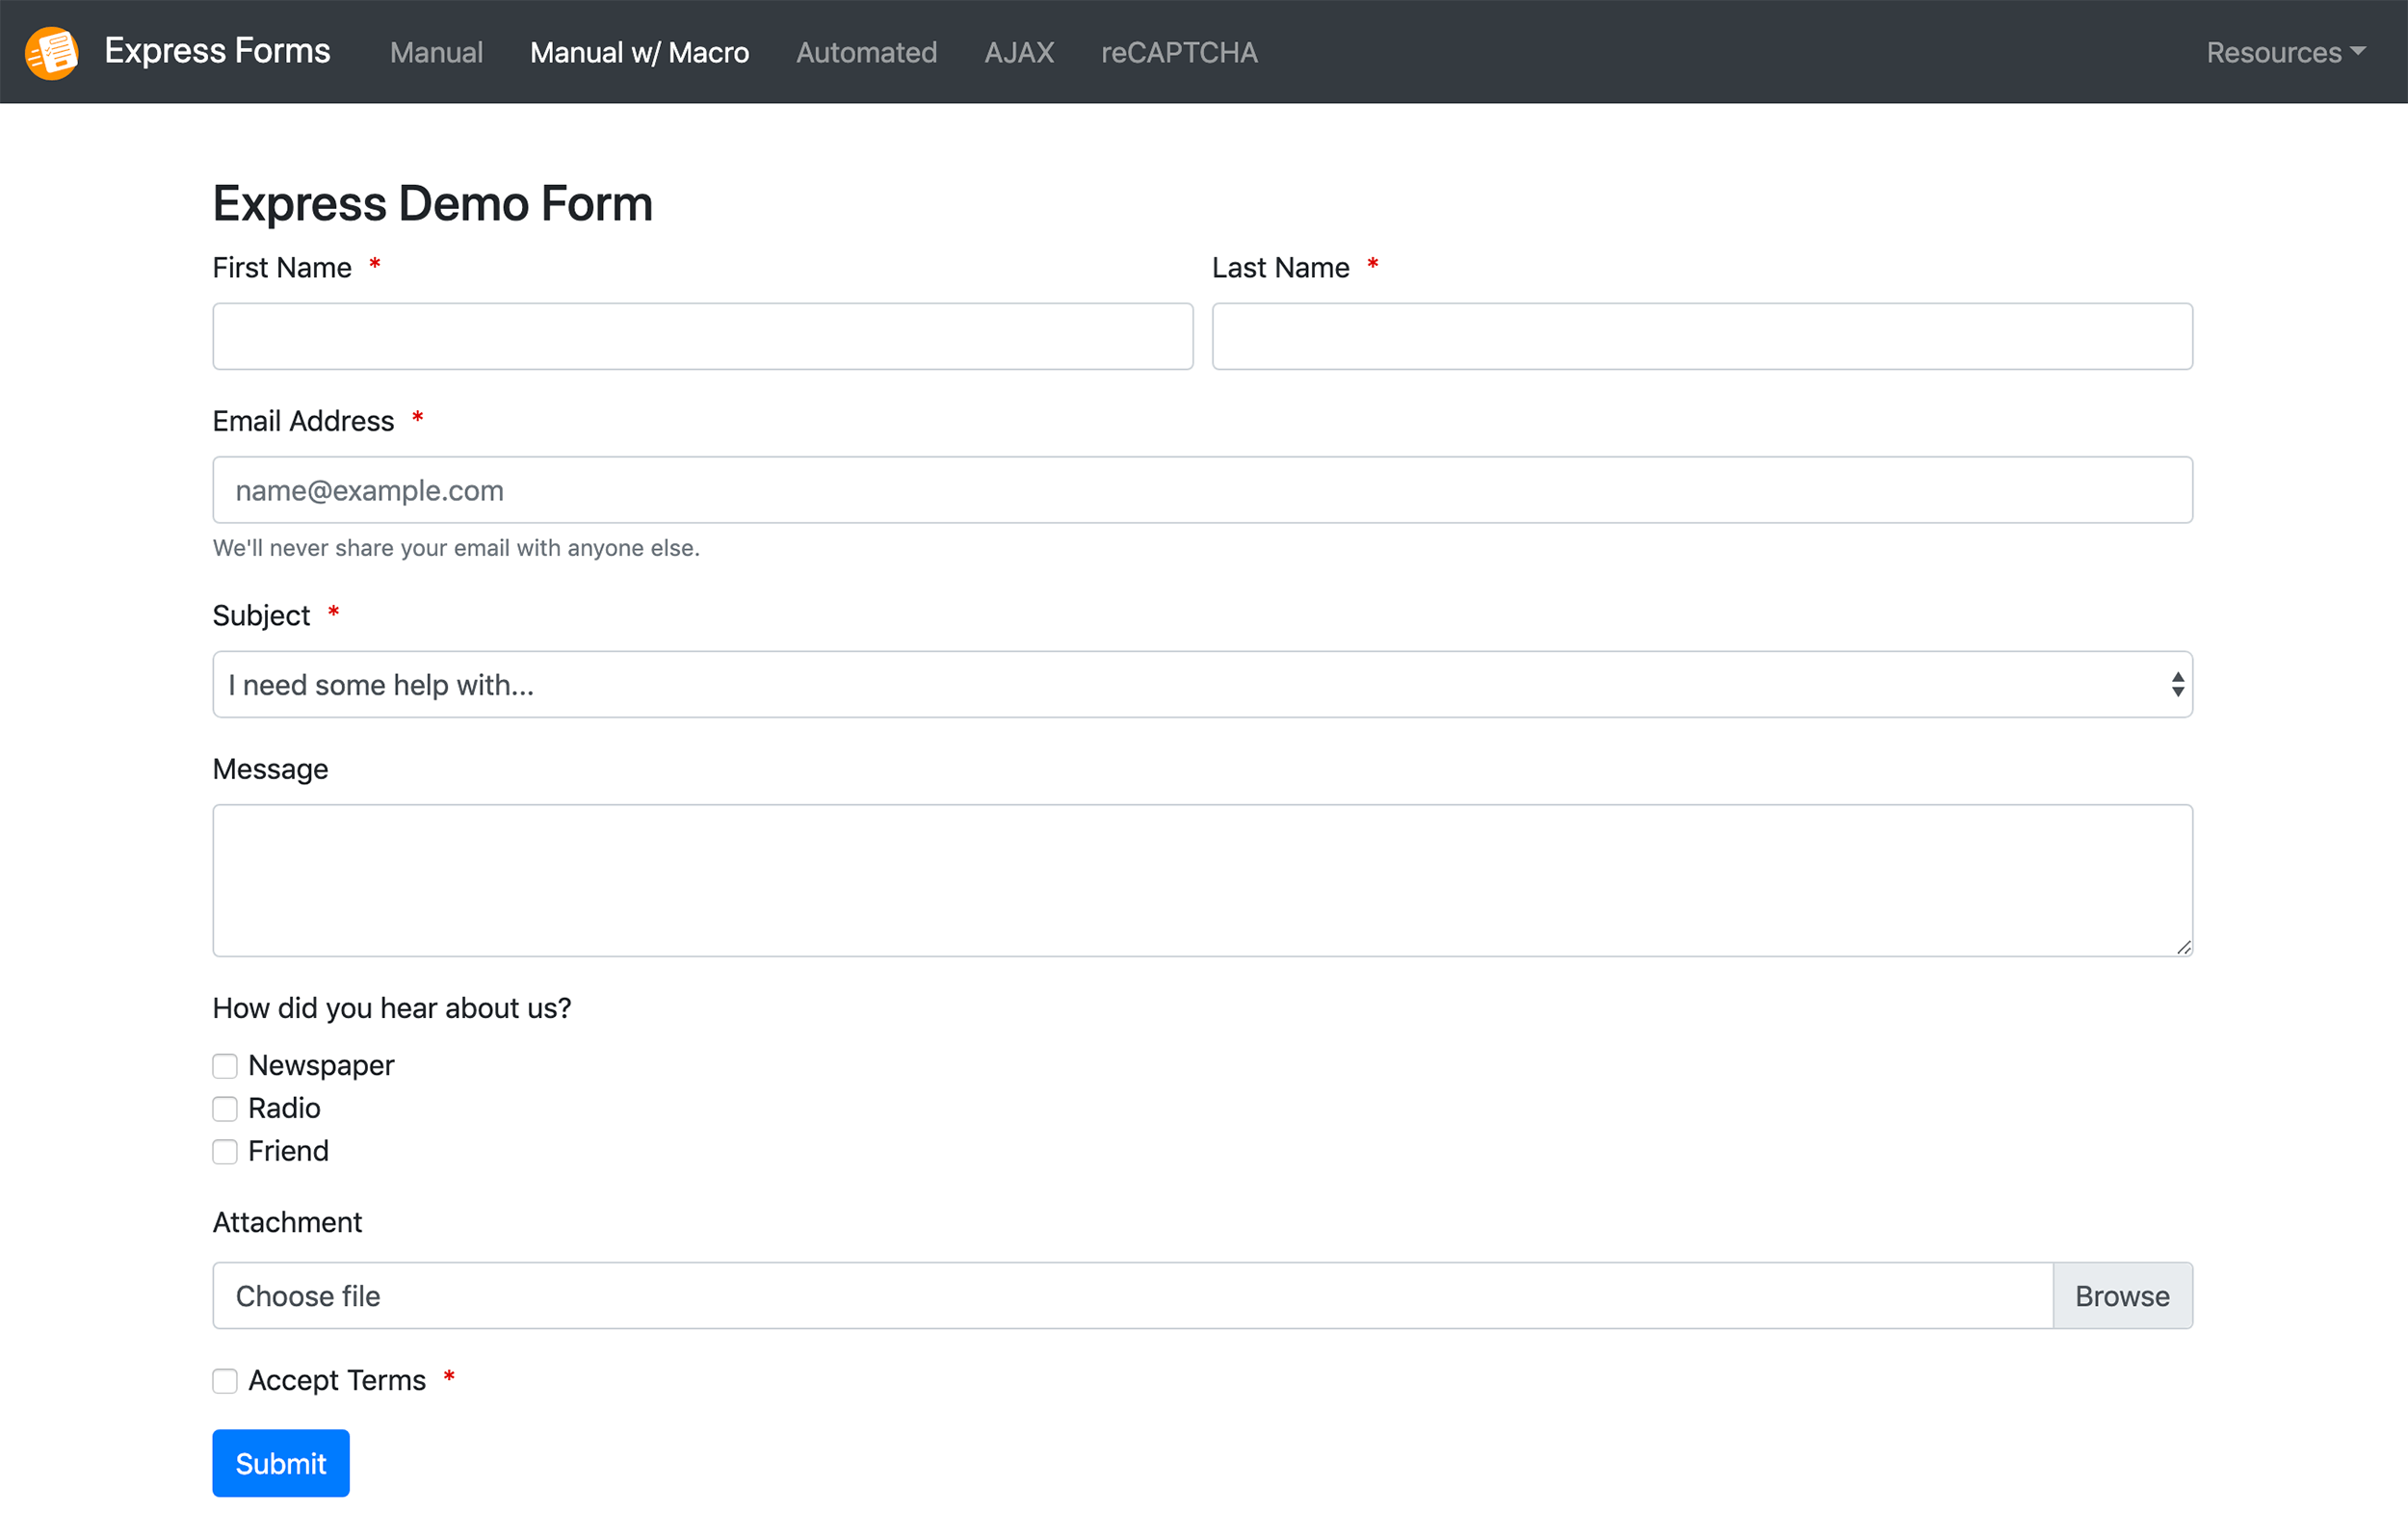
- You should now see a form that looks something like this:
- Try it out and see if it submits correctly. If it does, proceed to the next steps for taking your form further...
Setting up email notifications
A variety of email notification options are available with Express Forms. For the purpose of this example, we'll keep it simple and create an email notification for Admin(s) and an email notification for the user submitting the form.
- Go back to Express Forms inside the Craft CP, and under Settings, click to Email Notifications.
- Update the Template Directory Path setting to a path that is relative to the Craft Templates directory in a folder of your choice (e.g.
_notifications/), then click the Update button to save. - At the top right of the page, click on the New Template button.
- In the page to create a new email notification template, set it up the following way:
- Name:
Admin Contact - From Name:
{name} - From Email:
email@yourdomain.comor{email} - Reply-to Email:
{email} - Subject:
New {form.name} submission: {subject} - Email Body: leave the default message content in there for now.
- Name:
- Save the email notification template.
- Create another email notification template by clicking the New Template button at the top right again.
- Set this one up in the following way:
- Name:
Submitter Contact - From Name:
Your Website Name - From Email:
email@yourdomain.com - Reply-to Email:
email@yourdomain.com - Subject:
Thanks! We have received your submission! - Email Body: leave the default message content in there for now.
- Name:
- Save the email notification template.
- Go to the Forms page and click on the name of the
Contactform we just created. This will take us back to the form builder that will allow us to continue configuring the form. - Under the Notifications area on the lower left side of the page, set up in the following way:
- Admin Notification: select
Admin Contact. - Admin Email(s): add
you@yourdomain.com. - Submitter Notification: select
Submitter Contact. - Submitter Email: select
Emailfield.
- Admin Notification: select
- Save for your form again.
- Test it out again and see if it sends email notifications out correctly.
WARNING
If you're creating the file manually (not using the CP editor), be sure to escape single quotes with an extra single quote, e.g. We've should be We''ve in YAML.
Troubleshooting
If you are encountering any issues with Express Forms, including form submitting issues, email notifications not working, etc, please check out our Common Issues documentation to attempt to quickly resolve the issue.