


Email Notifications
Express Forms allows you to send email notifications upon submittal of a form. They are global and can be reused for multiple forms, saving you time when you are managing many forms.
Overview
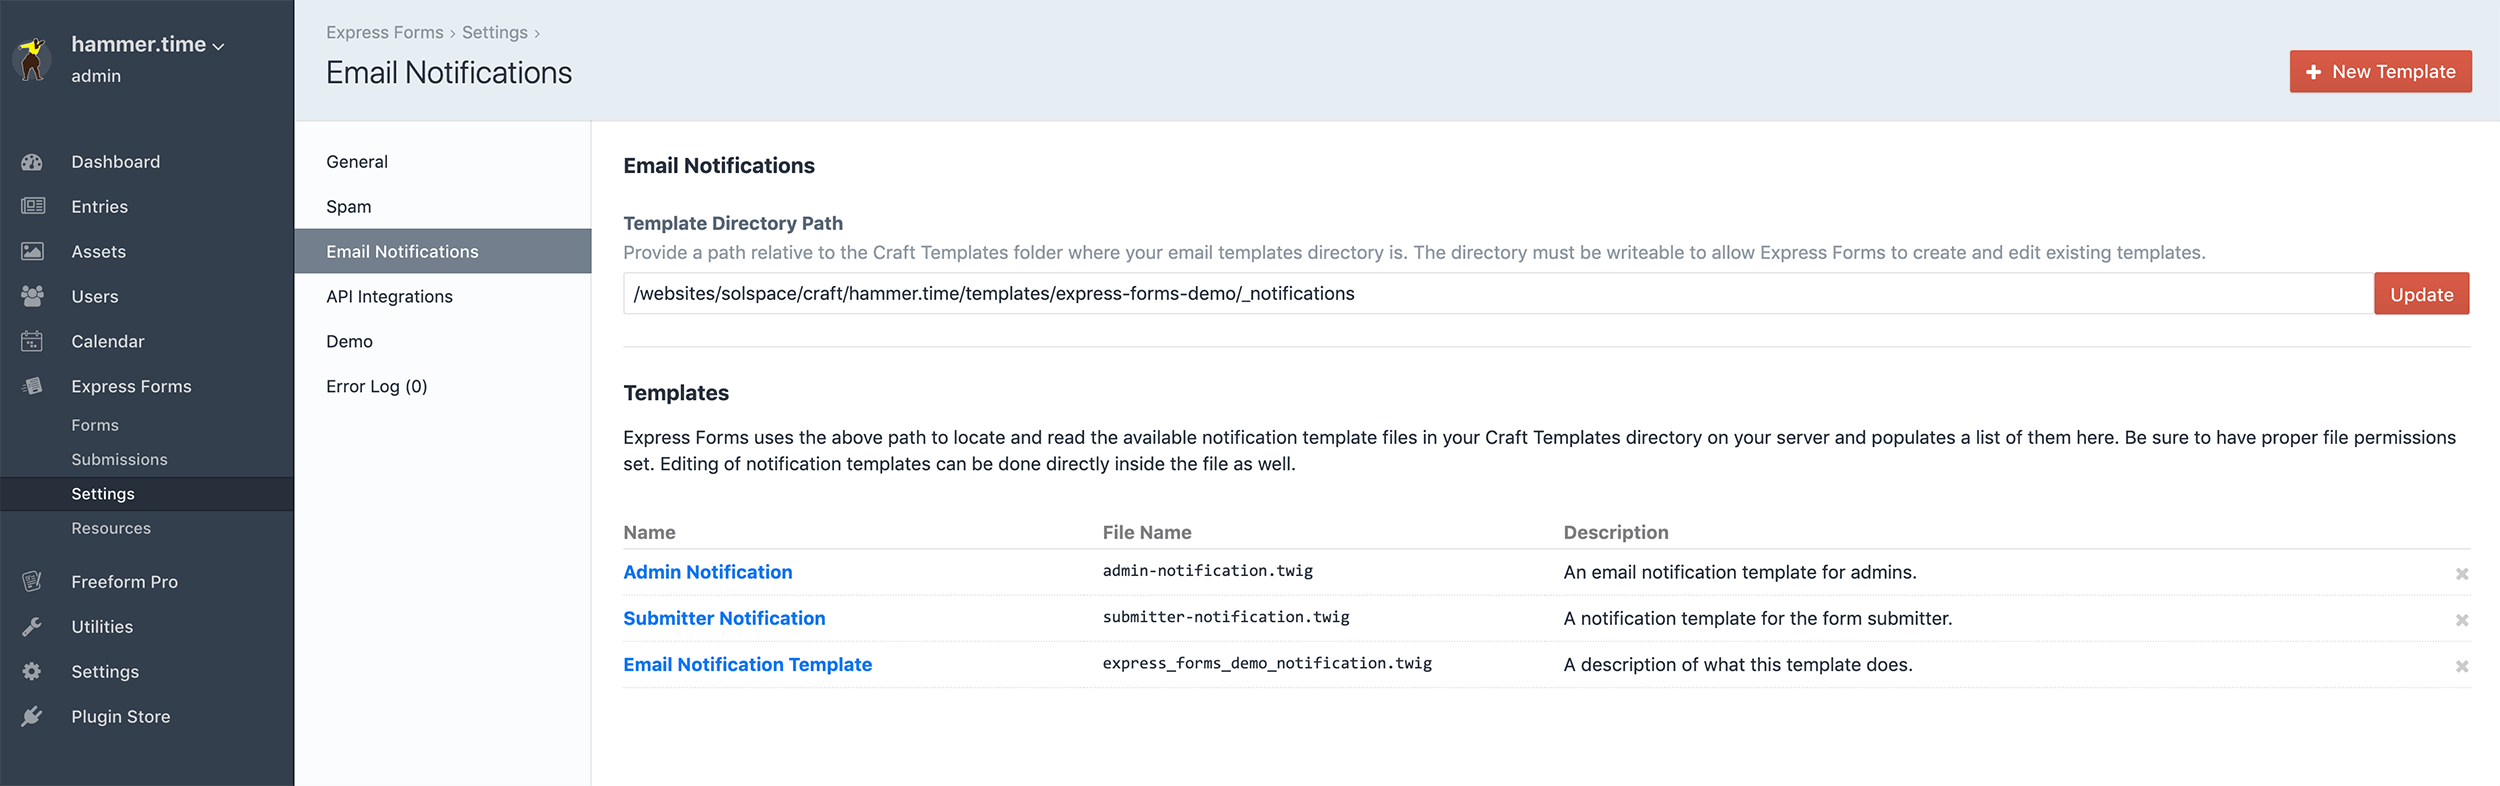
You may create as many email notification templates as you wish. Email Notifications are all stored as files in the Email Notificiation Templates directory that you specify in the settings, but are also able to be edited through the Express Forms control panel. Once you have the Template Directory Path setting set correctly, you'll see a list of all available templates. You can manage these file directly, or you can add/edit/remove these through the control panel.
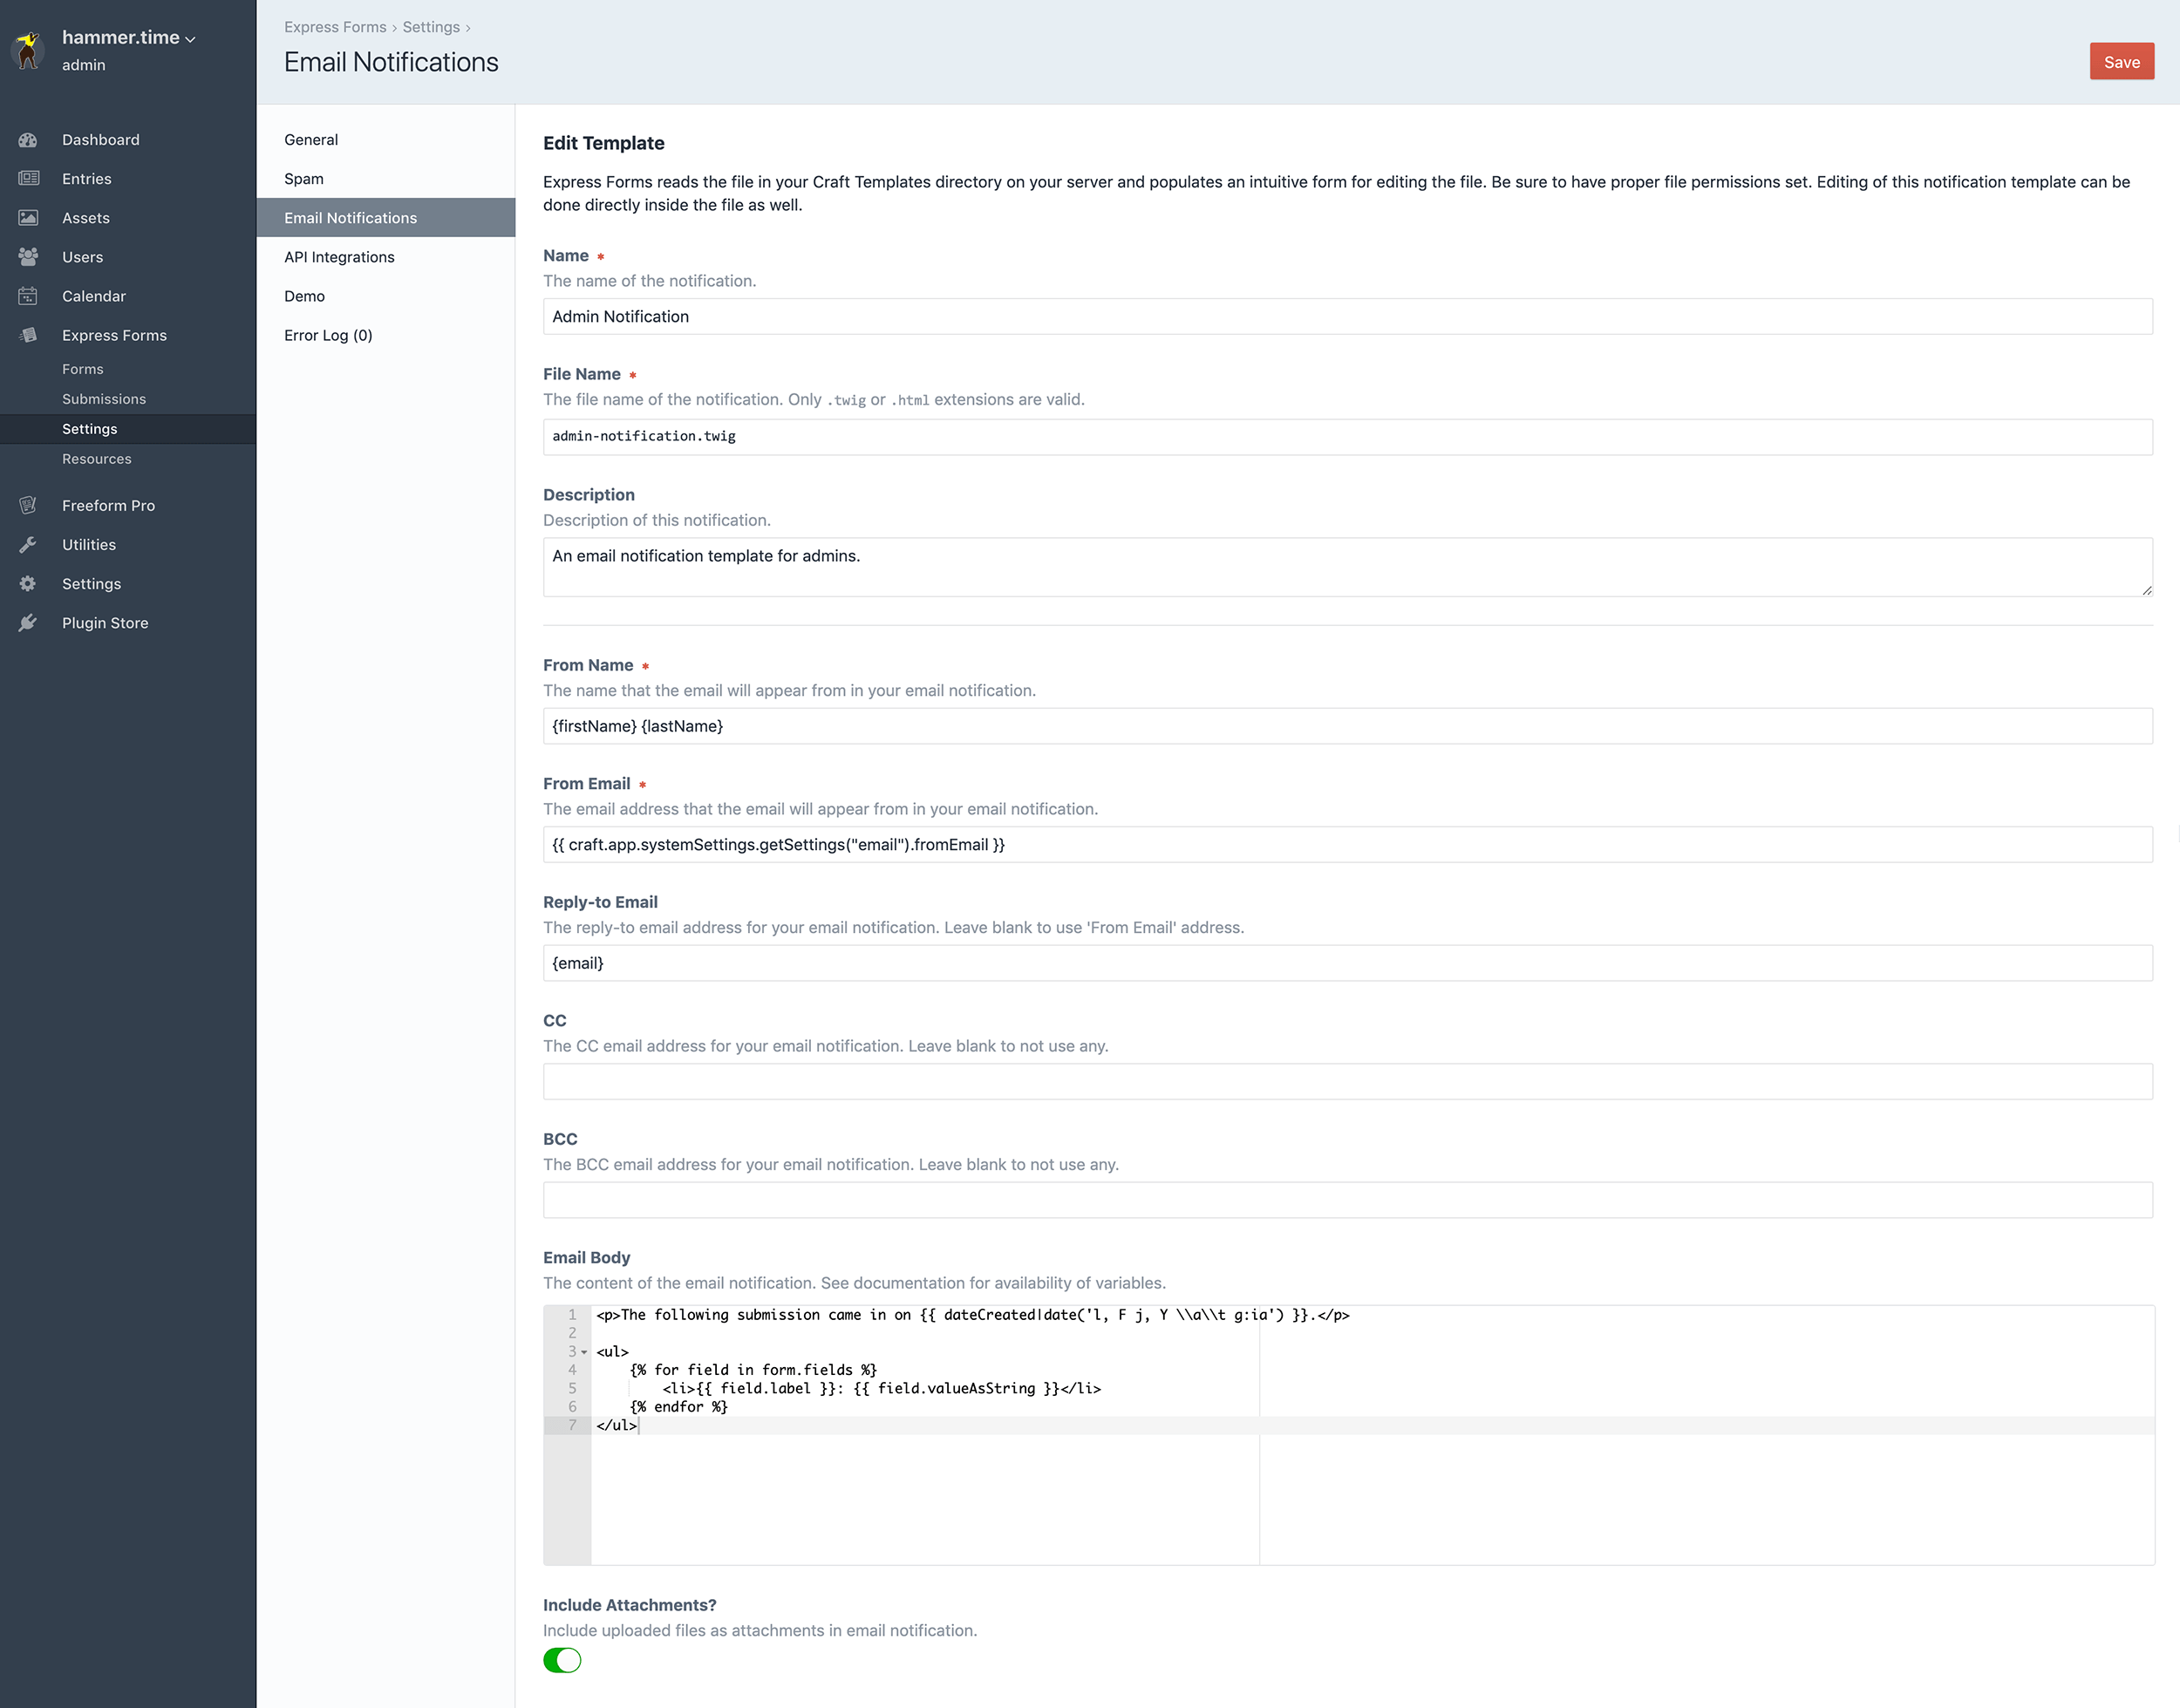
The following fields/settings are available:
- Name (how it's referred to in CP)
- File Name (read-only when editing)
- Description (of template)
- From Name
- From Email
- Reply-to Email
- CC Email
- BCC Email
- Subject
- Message Body (editor)
- Include Attachments (toggle)
TIP
Environment variables can be specified directly inside notification templates, e.g. $EMAIL_FROM_ADDRESS for From Name, From Email, and other email fields.
WARNING
If you're creating the file manually (not using the CP editor), be sure to escape single quotes with an extra single quote, e.g. We've should be We''ve in YAML.
Types
Express Forms allows you to send email notifications 4 different ways (all of them each being able to have their own notification templates, etc):
Admin
Email notifications can be sent to one or more admin email addresses. To setup:
- Go to the Form Builder interface for the form.
- Under Notifications at lower left, select an email notification template from the Admin Notification field.
- In the Admin Emails textarea, specify admin email address(es). Separate multiples by line breaks or commas or semicolons.
Dynamic Recipients
Email notifications can be sent to one or more pre-defined admin email addresses that are selected by the user filling out the form using the Dynamic Recipients field type approach. For example, you might have a select dropdown field that contains different departments for the user to address the email to. To setup:
- Go to the Form Builder interface for the form.
- Add a field that will act as your Dynamic Recipients field.
- You'll likely want to choose the Options field type, or Text if it's a select or radio type, though Options can work for that as well.
- Inside your page template, you'll need to include the
dynamicRecipientsparameter for the form, along with all that it entails.
The final template code might look something like this:
{% set form = craft.expressforms.form("formHandle") %}

{{ form.openTag({
  dynamicRecipients: {
    myFieldHandle: {
      map: {
        sales: "sales@example.com",
        service: "service@example.com",
        support: ["support@example.com", "another@example.com"]
      },
      template: "template-filename.twig",
    },
  }
}) }}

<select name="myFieldHandle">
  <option value="sales">Sales</option>
  <option value="service">Service</option>
  <option value="support">Support</option>
</select>
2
3
4
5
6
7
8
9
10
11
12
13
14
15
16
17
18
19
20
For more information, please see the Dynamic Recipients field type approach documentation.
Dynamic Template
Email notifications can be setup dynamically at template level using the dynamicNotifications parameter in your template. This allows you to hard code values or dynamically pass a value from another element such as a Craft Entry. To setup:
In your page template, add the dynamicNotifications parameter to your expressforms.form function, along with all that it entails.
The final template code might look something like this:
{% set form = craft.expressforms.form("formHandle") %}

{{ form.openTag({
  dynamicNotifications: {
    to: ["recipient-one@example.com", "recipient-two@example.com"],
    template: "template-filename.twig",
  }
}) }}
2
3
4
5
6
7
8
This will cause the form to send out the template template-filename.twig from your Email Notification Templates folder to the recipients recipient-one@example.com and recipient-two@examplte.com with the form and submission data passed to the template.
Submitter
Email notifications can be sent to the user submitting the form using the Email field type and targeting that specific field. This is often used to send an email confirmation for the user. To setup:
- Go to the Form Builder interface for the form.
- Under Notifications at lower left, select an email notification template from the Submitter Notification field.
- In the Submitter Email field, select the Email field that will contain the email address of the submitter.
When the form submitter enters their email address in this field, Express Forms will use that email address to send the email notification to.
Examples
In the Email Message Body and other fields, you can specify fields like:
{myFieldHandle}(e.g.{firstName}) - value submitted for the form submission.{{ submission.myFieldHandle }}(e.g.{{ submission.firstName }}) - value submitted for the form submission.- Conditional checks should be performed on the
submission.prefixed variables only. Examples:{% if submission.firstName | length %}HELLO{% endif %}{% if submission.firstName == "Bob" %}Hi Bob!{% endif %}
- Conditional checks should be performed on the
{{ form.name }}- name of the form.{{ dateCreated|date('l, F j, Y \\a\\t g:ia') }}- date the submission was created.- Can also automate the field data rendering:
<ul>
  {% for field in form.fields %}
    <li>{{ field.label }}: {{ field.valueAsString }}</li>
  {% endfor %}
</ul>
2
3
4
5
Here are some example email notification template files:
Admin
---
name: 'Admin Notification'
fromName: '{firstName} {lastName}'
fromEmail: '{email}'
replyTo: '{email}'
cc:
bcc:
subject: 'New submission from your {{ form.name }} form'
includeAttachments: true
description: 'This template is used for the Admin notification.'
---
<p>The following submission came in on {{ dateCreated|date('l, F j, Y \\a\\t g:ia') }}.</p>

<ul>
  {% for field in form.fields %}
    <li>{{ field.label }}: {{ field.valueAsString }}</li>
  {% endfor %}
</ul>
2
3
4
5
6
7
8
9
10
11
12
13
14
15
16
17
18
Submitter
---
name: 'Submitter Notification'
fromName: '{{ craft.app.projectConfig.get("email.fromName") }}'
fromEmail: '{{ craft.app.projectConfig.get("email.fromEmail") }}'
replyTo: '{{ craft.app.projectConfig.get("email.fromEmail") }}'
cc:
bcc:
subject: 'We''ve received your submission from the {{ form.name }} form'
includeAttachments: true
description: 'This template is used for the Submitter notification.'
---
<p>The following submission came in on {{ dateCreated|date('l, F j, Y \\a\\t g:ia') }}.</p>

<ul>
  {% for field in form.fields %}
    <li>{{ field.label }}: {{ field.valueAsString }}</li>
  {% endfor %}
</ul>
2
3
4
5
6
7
8
9
10
11
12
13
14
15
16
17
18
Manual
---
name: 'Admin Notification'
fromName: '{firstName} {lastName}'
fromEmail: '{email}'
replyTo: '{email}'
cc:
bcc:
subject: 'New submission from your {{ form.name }} form'
includeAttachments: true
description: 'This template is used for the Admin notification.'
---
<p>The following submission came in on {{ dateCreated|date('l, F j, Y \\a\\t g:ia') }}.</p>
<p>Here are the details:</p>
<ul>
  <li>Name: {firstName} {lastName}
  <li>Email: {email}
  <li>Home Phone: {homePhone}
  <li>Cell Phone: {cellPhone}
  <li>
    Services interested in:
    <ul>
    {% for value in interestedIn.value %}
      <li>{{ value }}</li>
    {% endfor %}
    </ul>
  </li>
  <li>
    Message:<br />
    {message}
  </li>
</ul>
2
3
4
5
6
7
8
9
10
11
12
13
14
15
16
17
18
19
20
21
22
23
24
25
26
27
28
29
30
31
Using with Environment Variables
Environment variables can be specified directly inside notification templates, e.g. $EMAIL_FROM_ADDRESS for From Name, From Email, and other email fields.
---
name: 'Submitter Notification'
fromName: $EMAIL_FROM_NAME
fromEmail: $EMAIL_FROM_EMAIL
replyTo: 'mc@hammer.time'
cc:
bcc:
subject: 'We''ve received your submission from the {{ form.name }} form'
includeAttachments: true
description: 'This template is used for the Submitter notification.'
---
<p>The following submission came in on {{ dateCreated|date('l, F j, Y \\a\\t g:ia') }}.</p>

<ul>
  {% for field in form.fields %}
    <li>{{ field.label }}: {{ field.valueAsString }}</li>
  {% endfor %}
</ul>
2
3
4
5
6
7
8
9
10
11
12
13
14
15
16
17
18
Using with Layouts
You can also use another template to set a layout for your Email Notification templates, making it easier to set consistent headings, footers and styles globally across all of your Email Notification templates. Like anywhere else, just make use of {% extends "some/template" %}.
Create a layout template anywhere in your Craft Templates directory (e.g. _layout/email-notifications):
<html>
<head>
  <title>Global Layout</title>
</head>
<body>

<h1>Global Layout</h1>
<div>
  {% block content %}{% endblock %}
</div>

</body>
</html>
2
3
4
5
6
7
8
9
10
11
12
13
And then in your Express Forms email notification template, something like:
{% extends "_layout/email-notifications" %}

{% block content %}

  <p>The following submission came in on {{ dateCreated|date('l, F j, Y \\a\\t g:ia') }}.</p>
  <ul>
    {% for field in form.fields %}
      <li>{{ field.label }}: {{ field.valueAsString }}</li>
    {% endfor %}
  </ul>

{% endblock %}
2
3
4
5
6
7
8
9
10
11
12