Installing & Updating
Requirements
Calendar meets mostly the same requirements as listed on the Craft Requirements page.
- Craft 4.0.0+
- PHP 8.0.2+
- MySQL 5.7.8+ with InnoDB, MariaDB 10.2.7+, or PostgreSQL 9.5+
- The following PHP Extensions (usually included in most server environments):
- Windows and macOS browsers:
- Chrome 63+
- Firefox 67+
- Safari 11.1+
- Edge 79+
Installation
Calendar can be installed one of two ways:
Install from the CLIRecommended
Calendar can be installed through the CLI:
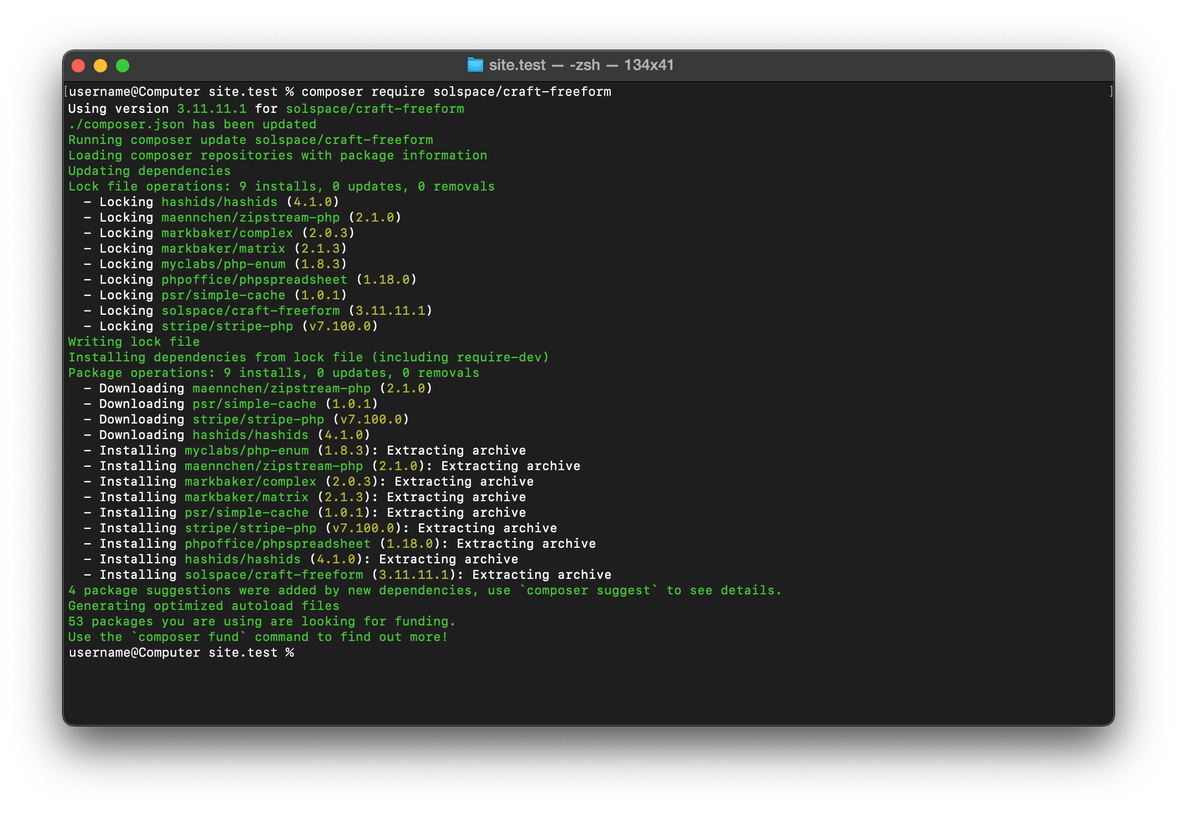
Open your CLI app and go to your Craft project:
cd /path/to/project
Then tell Composer to require the plugin:
composer require solspace/craft-calendar
To load a specific version, use:
composer require solspace/craft-calendar:4.0.2
In the Craft control panel, go to Settings → Plugins and click the Cog button for Calendar and select Install.
Project Config
Open up your Project Config file (/config/project/project.yaml) and/ search for calendar. Where it says edition: lite, switch that to edition: pro and then approve the update inside the CP.
From CP
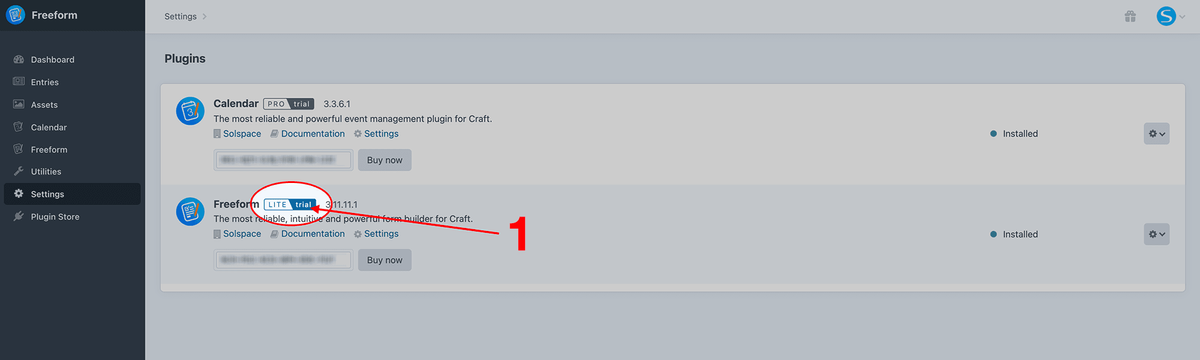
Click on the LITE / trial button beside Calendar's name and when it takes you to the Plugin Store page, scroll down to the bottom and click on the Try button for the Pro edition.
If Calendar is right for your site, purchase a copy of it through the Plugin Store when you're ready!
Install from the Control Panel
Go to the Plugin Store area inside your Craft control panel and click on Calendar.
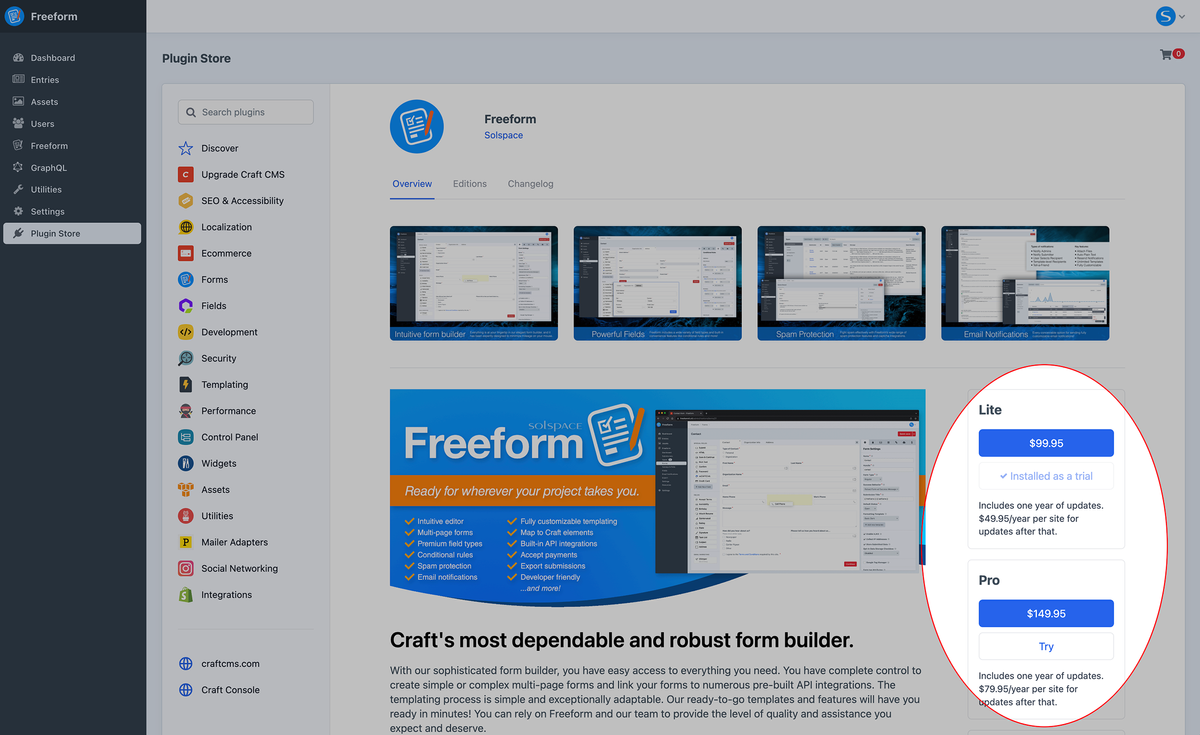
Once the product page opens, choose whether you want to install it by clicking the Try button under the Lite or Pro edition.
If Calendar is right for your site, purchase a copy of it through the Plugin Store when you're ready!
Updating
Calendar uses the Craft Updates Service, which means that every time there's an update available, it'll show up in the Updates area (Utilities → Updates) of the Craft control panel. You can then review the changelog there, or view it here.
Calendar can be updated one of three ways:
Update from the CLIRecommended
You can use the Craft update command to update Calendar.
Be sure to back up the database before proceeding.
Open your CLI and go to your Craft project:
cd /path/to/project
To see available updates, run this command:
php craft update
Follow the prompts, or run:
php craft update calendar
To update to a specific version of Calendar, run:
php craft update calendar:5.0.0
Updating from the CLI will look something like this:
[username@Computer site.test % php craft update
Fetching available updates ... done
You've got one available update:

  - calendar 5.0.2 => 5.1.6

Run craft update all or craft update <handle> to perform an update.

[username@Computer site.test % php craft update calendar
Fetching available updates ... done
Performing one update:

  - calendar 5.0.2 => 5.1.6

Create database backup? (yes no) [yes]:yes
Backing up the database ... done
Performing update with Composer ... done
Applying new migrations ... done
Checking for pending Craft and plugin migrations ...
No new migrations found. Your system is up to date.

username@Computer site.test %
Update via Composer from the CLI
You can also update Calendar more manually if you like, using Composer (composer update). This may also be helpful in certain scenarios where you need to workaround an issue while updating.
Be sure to back up the database before proceeding.
Open your Craft site's main composer.json file and adjust the version number for Calendar (see guide below).
"require": {
"craftcms/cms": "^4.0.0",
"vlucas/phpdotenv": "^5.4.0",
"solspace/craft-calendar": "^4.0.0-beta.1"
},
Open your CLI app and go to your Craft project:
cd /path/to/project
To run any available updates for your site, run:
composer update
Proceed to the Craft control panel and click the Finish Updates button if it shows.
Update from the Control Panel
Be sure to back up the database before proceeding.
Go to the Craft Updates area inside the control panel (Utilities → Updates) and review the changelog for Calendar.
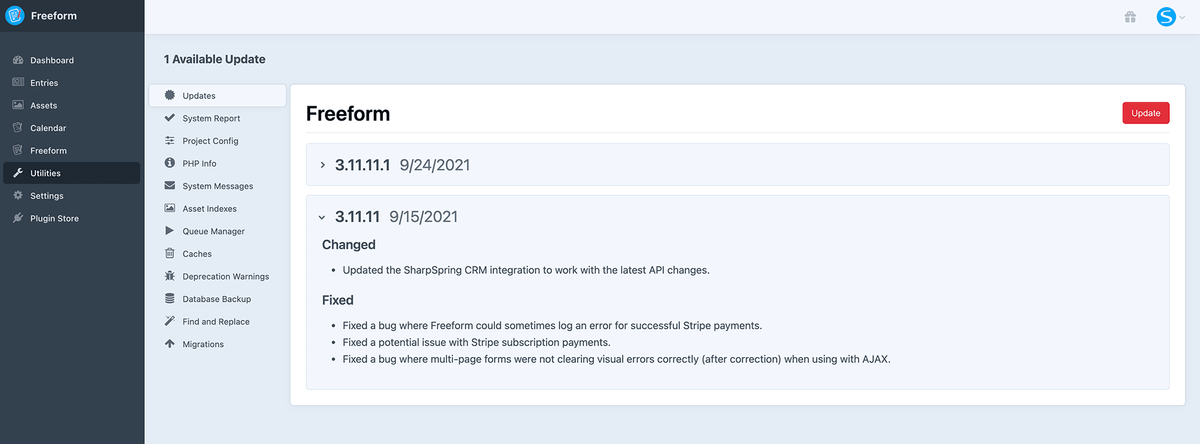
Simply click the Update button and Craft will do the rest.
Understanding versions and composer update
- For example, under the
"require"area, change"solspace/craft-calendar": "4.0.2",to"solspace/craft-calendar": "4.1.3",. - You can also use
~and^to somewhat automate your updating process.1.0.0- means exactly & only this version~1.0.0- means this version & any patch release (up to1.0.99̅)^1.0.0- means this version & any minor release (up to1.99̅.99̅)- Specifying
"solspace/craft-calendar": "^4.0.0",for example, would always get you the latest version of Calendar 4.x (e.g.4.1.9), but never a next major version of Calendar like 5.x.
- Specifying
Your final composer.json file might have something like this:
"require": {
    "craftcms/cms": "^4.0.0",
    "vlucas/phpdotenv": "^5.4.0",
    "solspace/craft-freeform": "^4.0.0-beta.1",
    "solspace/craft-calendar": "^4.0.0-beta.1",
},
Purchasing
Trialing
Craft allows you to trial third-party plugins to see if they're right for your needs. We recommend trying any commercial plugin first before buying it. You can trial any plugin or Craft CMS itself by running your site from any domain that Craft does not consider to be a public domain.
Purchasing
If this is your first time purchasing a third-party plugin, here's an overview of the purchasing process of plugins. You may purchase licenses for plugins either via the Craft Plugin Store website or directly through the Craft Control Panel. For the latter, here is the process:
- Go to the Plugins section of your Craft control panel (Craft CP → Settings → Plugins).
- For the plugin(s) that need purchasing, click on the Buy Now button to add it to your cart.
- Proceed to purchase the plugin directly inside your Craft control panel. You can optionally pre-purchase renewal years as well if you think you're going to need updates and product support beyond the first year. You can also purchase renewals later on after expiry if you wish.
- Once purchased, the current trial license key for the Calendar will become valid. These product keys can also be accessed and managed later on in your Craft Console account by visiting the Plugins area.
If you run into any issues with licensing your plugin, please see the Troubleshooting guide below.
Renewals
Renewals are not required to continue to use Calendar past the 1-year term, but they are required if you wish to update to newer versions of Calendar and to receive official support from Solspace. Renewals can be set to automatic or you may also purchase a renewal directly through the Craft Control Panel or via the Craft Console website.
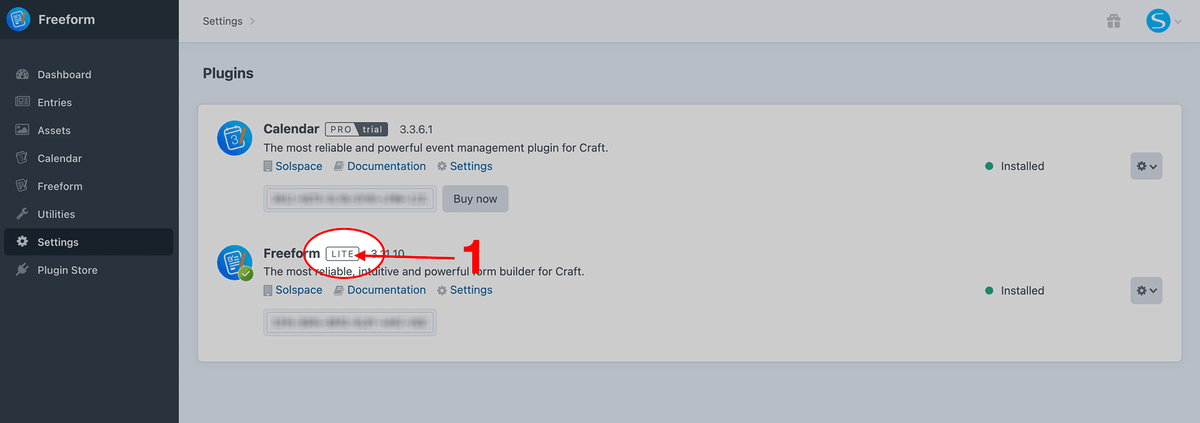
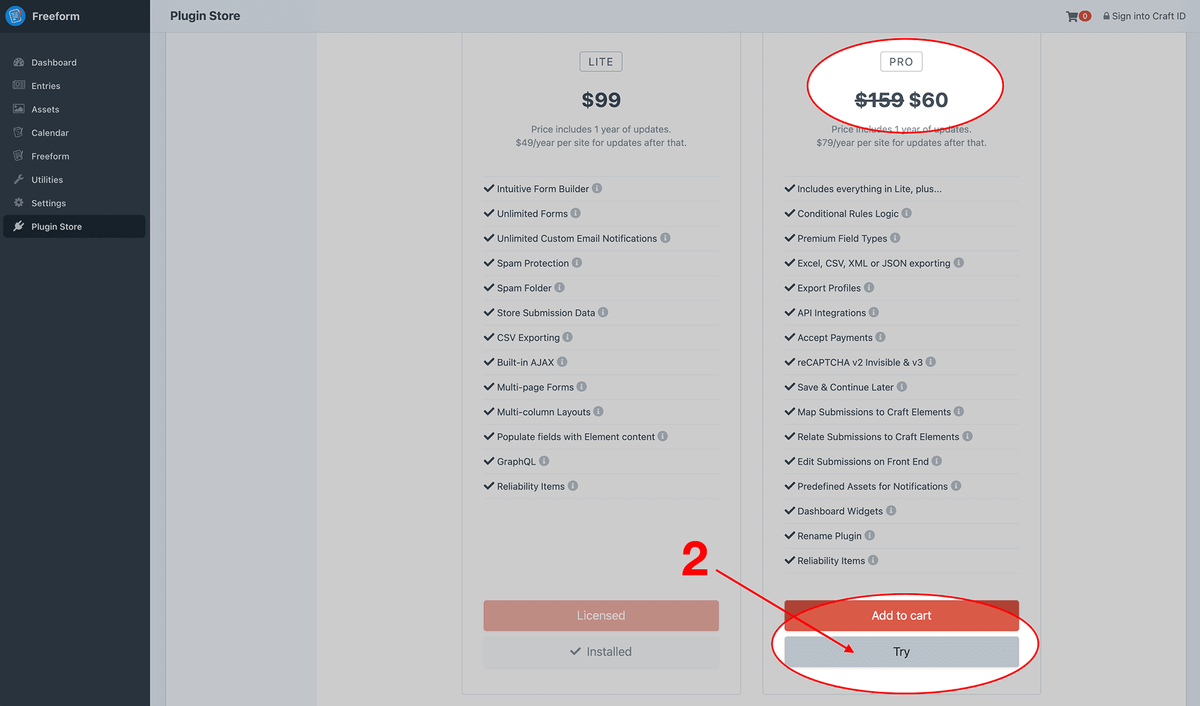
Changing Editions
If you wish to change the edition of Calendar from Lite to Pro (or Pro to Lite while trialing), simply visit the Plugin Store area in the Craft control panel and click on the Try button for the edition you wish to change to. If you've already purchased a copy of Calendar Lite but wish to upgrade to the Pro edition, you can do so for the price difference only ($100).
If using Craft's allowAdminChanges config setting, be sure to temporarily set it to true in order to make changes to the edition (which can be switched back to false afterward).
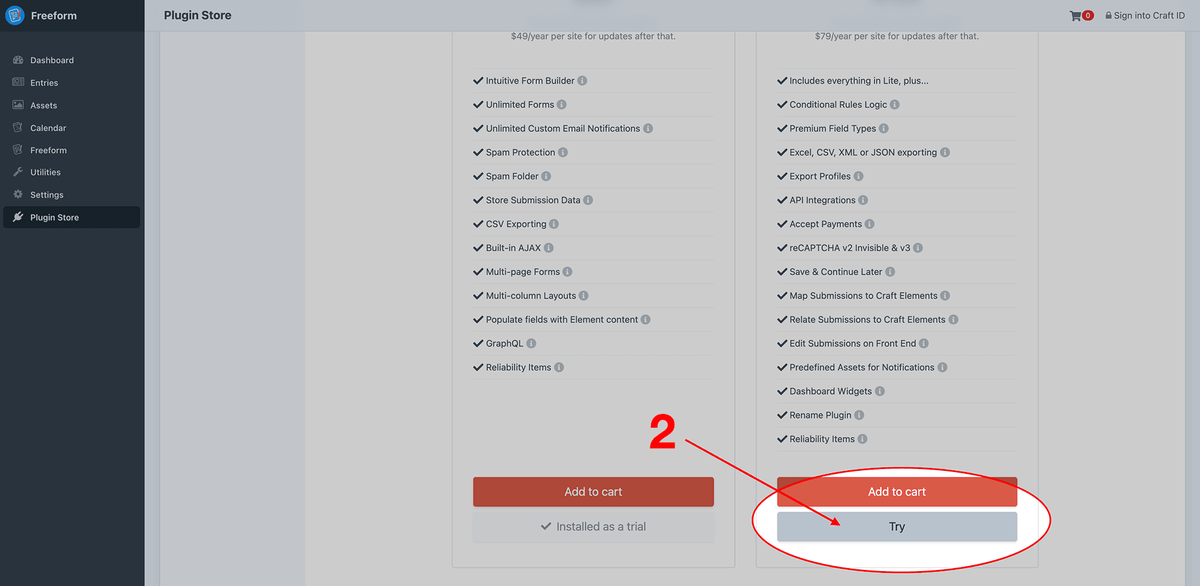
How to Switch During Trial
If you'd like to switch during the trial from Lite to the Pro edition, you can switch the edition 1 of 2 ways:
- From Project Config: Open up your Project Config file (
/config/project/project.yaml) and search forcalendar. Where it saysedition: lite, switch that toedition: proand then approve the update inside the CP. - From CP: Click on the LITE / trial button beside Calendar's name and when it takes you to the Plugin Store page and click on the Try button for the Pro edition.
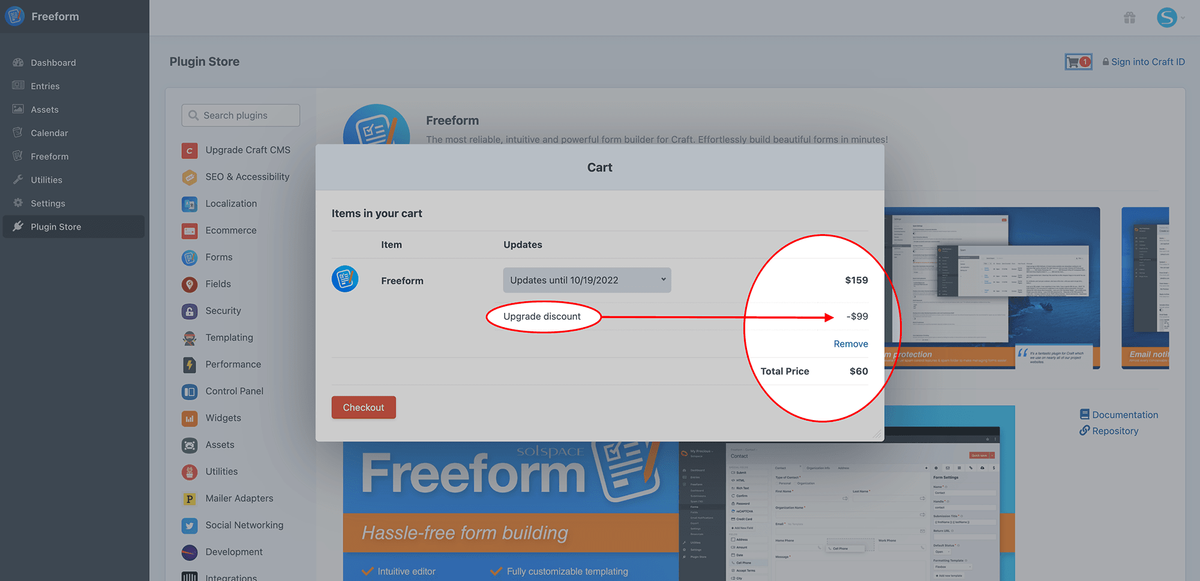
How to Switch After Purchase
If, sometime after purchasing Calendar Lite, you decide that you need more features that are available in the Pro edition, you can switch at any time for the price difference (e.g. from Lite to Pro would be $100) rather than needing to purchase the Pro edition at full price. We suggest you start by switching to a trial of the Pro edition and then purchase it if it meets your needs. You can switch the edition 1 of 2 ways:
- From Project Config: Open up your Project Config file (
/config/project/project.yaml) and search forcalendar. Where it saysedition: lite, switch that toedition: proand then approve the update inside the CP. - From CP: Click on the LITE / trial button beside Calendar's name and when it takes you to the Plugin Store page and click on the Try button for the Pro edition.
Once you're ready to complete the purchase, you can visit the Cart inside your site's control panel:
Troubleshooting
Third-party plugin licenses are managed and validated entirely by Craft. Some issues may require that you contact the Craft Team directly if issues persist. The following troubleshooting tips account for the most common issues we've seen our customers report to us:
- Error: 'This license is tied to another Craft install'
- Error: 'This license isn't allowed to run version X.X.X.'
- Plugin shows it's 'Missing'
- Can't purchase upgrade from Lite to Pro edition
Error: 'This license is tied to another Craft install'
If you receive the error This license is tied to another Craft install. Visit id.craftcms.com to resolve., it is indicating that the license is tied to another install of Craft CMS. This is likely because either you purchased this under a different domain or subdomain, or something glitched in the process of purchasing the license. Regardless of what happened here, this can likely be resolved by:
- Visit your Craft Console account.
- Under Licenses → Plugins, look for the Calendar (or affected plugin) license in the list and confirm it's tied to the correct Craft CMS license. If not, click into the license (e.g.
CRZ6) and click on the Detach from this Craft license button. This will release it from being attached to the wrong or orphaned Craft CMS license and allow you to enter it into the Craft install you're using.
If you are moving an existing site to a new non-public domain from a different local hostname, you will need to clear your data caches from the Clear Caches tool on the Settings page before Craft realizes that the hostname has changed.
Error: 'This license isn't allowed to run version X.X.X.'
If you receive the error This license isn't allowed to run version X.X.X., it indicates that you're using a version of the plugin that your license isn't eligible for, which in almost all cases would be a plugin license that expired/finished the 1-year term since the initial purchase. According to Craft's policy (out of Solspace's control), once the plugin license has expired, the current version you have installed is the maximum version you can have. The rationale behind this (according to Craft) is that if, for example, you were using Calendar 3.10.1 at the time of expiry, but 3.11.4 was available to you just before the license expiry date, if that 3.11.4 version was available to you indefinitely, one might update to that version months or years later and experience issues while upgrading, which could generate issues and support requests to the developer beyond that initial 1 year term. This is a fair statement and concern on Craft's part, in our opinion. Craft does send out 30 day notices reminding customers of plugin licenses nearing expiry, so it would be wise to consider squeezing in your final update(s) earlier in that 30 day window if you do not wish to renew your license for future updates beyond the initial 1 year term.
When a license expires, you can keep using the version that's currently installed, however you won't be able to update it to newer versions until you've renewed the license.
As for how this happened in the first place, Craft's CP updater and their recommended built-in update command feature will make sure that you never update to a plugin version you don't have access to. However, if you used Composer to update, it bypasses all of Craft's license validation and you can get yourself into the situation where you now have a version that your license shouldn't have access to, which then generates the error inside the Craft CP. The only way to resolve this would be reverting back to the previous version (which is not always recommended, as it's possible plugin update migration(s) could have taken place, and reverting could break your install), or renew your license. Please feel free to reach out to us for further clarification and assistance if you're in a bind with this, and we'll do the best we can to help.
Plugin shows it's 'Missing'
If you have a plugin that shows as Missing, this is because you don't have the plugin installed and/or the plugin files are not in the Craft vendor folder, BUT you have a valid purchased Craft 3 license for the plugin tied to that Craft install. Depending on your scenario, you likely either have the issue of wanting the plugin to be available, or not wanting it to show up there.
If you purchased the plugin and are expecting it to show up for install, what likely happened is that Craft or your server environment glitched and didn't correctly add the plugin dependency (files) to your Craft site's vendor folder (but knows that you have a valid purchase of it). If this is the case, you'll need to follow the Installation Instructions documentation above to install the plugin.
If the above is not the case for you, and you don't want this license showing up in your Craft site, this can likely be resolved by:
- Visit your Craft Console account.
- Under Licenses → Plugins, look for the Calendar (or affected plugin) license in the list and confirm it's tied to the correct Craft CMS license. If not, click into the license (e.g.
CRZ6) and click on the Detach from this Craft license button. This will release it from being attached to the wrong or orphaned Craft CMS license, and later use it on the correct/different Craft install.
Can't purchase upgrade from Lite to Pro edition
If you're currently using the Lite edition of Calendar and are trying to purchase an upgrade to the Pro edition, but it's not letting you (the Add to Cart button isn't showing), please ensure that the allowUpdates and allowAdminChanges Craft General Config items are NOT set to false. At least enable them temporarily to allow this change to happen.
'allowUpdates' => true
'allowAdminChanges' => true